I have a complicated history with apple pie. Growing up, it was the ultimate comfort food. The smell of cinnamon and baked apples meant holidays, family, and a sense of everything being right in the world. But when I started my fitness journey, determined to lose the 65-70 pounds that were weighing me down, apple pie became the enemy.
It was a symbol of everything I thought I had to give up. Sugar, butter, a flaky crust—it was a calorie bomb that didn’t fit into my new world of clean eating and macro tracking. For years, I avoided it. I’d see it at a gathering and feel that pang of deprivation, which is a dangerous feeling for an ADHD brain. Deprivation often leads to a spiral of “I’ve been so good, I deserve this,” followed by overindulgence and guilt.
Then, something clicked. The goal was never to be perfect. The goal was to be consistent. My entire philosophy at ADHD FIT is built on working with your brain, not against it. That means building flexible systems that allow for comfort and enjoyment, because a plan you hate is a plan you’ll quit. I realized I didn’t need to banish apple pie from my life.
I just needed to build a better one. A version that aligned with my goals. One that was packed with protein to keep me full, used smart ingredients to keep calories in check, and tasted so good I wouldn’t even miss the original. This recipe is the result of that mission. It’s for anyone who has been told they have to choose between their favorite foods and their fitness goals. You don’t.
Skip to My Flexible Diet Recipe!
Why Apple Pie Is Great For Fat Loss
Let’s be direct. When you hear “apple pie” and “fat loss” in the same sentence, it’s natural to be skeptical. Traditional apple pie is loaded with refined flour, heaps of sugar, and a ton of butter. It’s a recipe for a massive blood sugar spike, intense cravings, and a calorie count that can derail an entire day of healthy eating. This recipe is different. It’s built from the ground up on our core principles.
First and foremost, we lead with protein. Protein is the cornerstone of sustainable fat loss because it’s incredibly satiating. It keeps you feeling full for longer, which is your number one weapon against mindless snacking and cravings. We’ve packed protein into both the crust and the filling using whey protein powder and Greek yogurt. This turns a dessert from an “empty calorie” indulgence into a functional part of your diet.
Next is hunger management. The combination of protein and fiber from the apples and oat flour slows down digestion. This helps stabilize your blood sugar, preventing the energy crashes that often trigger a hunt for quick, sugary snacks. For the ADHD brain, which can be prone to impulsive eating when energy dips, this is a game-changer. You get the satisfying taste of dessert without the negative metabolic fallout.
Finally, this apple pie supports a flexible eating lifestyle. We aren’t about “cheat meals.” That mindset creates a cycle of restriction and binging. Instead, we build small, planned indulgences into our routine. Having a slice of this pie is a planned event. It satisfies your craving for something sweet and comforting, making you less likely to feel deprived and go off the rails. It’s a tool for consistency, and consistency is what drives results.
Ingredients You’ll Need for Apple Pie
A great recipe doesn’t need a million complicated ingredients. For those of us with ADHD, a long and intimidating ingredient list can be a major barrier to even starting. That’s why I’ve kept this list focused on simple, powerful, and easy-to-find items. We’re building a high-performance dessert, and every ingredient has a specific job to do.
The real star of this recipe, the ingredient that gives it a unique twist, is the plain non-fat Greek yogurt in the filling. This is our secret weapon. Instead of a sugary, butter-laden sauce, we’re creating a creamy, tangy, and protein-packed mixture that coats the apples perfectly. It adds incredible richness and moisture without the fat and calories, while also contributing a significant protein boost. It’s a simple swap that completely changes the nutritional profile of the pie.
Here’s exactly what you’ll need to grab:
- For the Crust:
- 1 cup oat flour
- 1/2 cup vanilla or cinnamon-flavored whey protein powder
- 1/4 cup almond flour
- 2 tablespoons coconut oil, melted
- 1 tablespoon maple syrup
- 3-4 tablespoons cold water
- 1/4 teaspoon salt
- For the Filling:
- 4 medium baking apples (such as Granny Smith or Honeycrisp), peeled, cored, and thinly sliced
- 1/2 cup plain non-fat Greek yogurt
- 1/4 cup vanilla whey protein powder
- 2 tablespoons zero-calorie brown sugar substitute
- 1 tablespoon lemon juice
- 1 teaspoon ground cinnamon
- 1/2 teaspoon ground nutmeg
- Pinch of ground ginger
- For the Topping (optional):
- 1/4 cup rolled oats
- 2 tablespoons chopped pecans
- 1 tablespoon zero-calorie brown sugar substitute
- 1/2 teaspoon ground cinnamon
- 1 tablespoon light butter, melted
A quick note on protein powder: the quality and taste of your whey will have a huge impact on the final product. Use a brand you genuinely enjoy the taste of. If your protein powder is chalky or has a weird aftertaste, your apple pie will too. For the apples, using a firm, tart variety like Granny Smith is key. They hold their shape during baking and their tartness balances the sweetness of the other ingredients.
How To Make Apple Pie (Step-By-Step)
Making a pie from scratch can sound intimidating, but I promise you, we’ve made this process as straightforward as possible. There’s no complicated pastry work or techniques that require a ton of focus. We are basically just mixing a few things in bowls and putting them in a pie plate. You can do this, even on a low-motivation day.
Step 1: Preheat Your Oven and Get Organized
First thing’s first, get that oven preheating to 375°F (190°C). This is a classic ADHD tip for task initiation: do the easiest, most passive step first. While it heats up, you can gather your ingredients. This prevents that moment of panic when you realize you forgot to preheat and now have to wait. Get out your bowls, your pie plate, and your measuring cups.
Step 2: Make the Protein Crust
In a medium bowl, mix together the dry crust ingredients: oat flour, the first 1/2 cup of protein powder, almond flour, and salt. Whisk them until they’re well combined. Then, add your melted coconut oil and maple syrup. Mix it with a fork until it looks like coarse, crumbly sand. Now, add the cold water one tablespoon at a time. This part is important. Don’t dump it all in at once, or you’ll have a sticky mess. Mix after each tablespoon until a workable dough forms.
Step 3: Press the Crust into the Pie Plate
Here’s the best part: no rolling pin required. Just dump the dough into your 9-inch pie plate and use your fingers or the bottom of a measuring cup to press it evenly across the bottom and up the sides. This is a forgiving, practical crust. Don’t worry about perfection; just aim for a relatively even thickness so it bakes uniformly.
Step 4: Prepare the Apple Filling
Put your sliced apples in a large bowl and toss them with the lemon juice. This simple step keeps them from turning brown while you prepare the rest of the filling. In a separate, smaller bowl, whisk together the Greek yogurt, the remaining 1/4 cup of protein powder, the brown sugar substitute, cinnamon, nutmeg, and ginger. Whisk it until it’s completely smooth. Pour this creamy mixture over the apples and gently fold everything together until all the slices are coated.
Step 5: Assemble and Bake the Pie
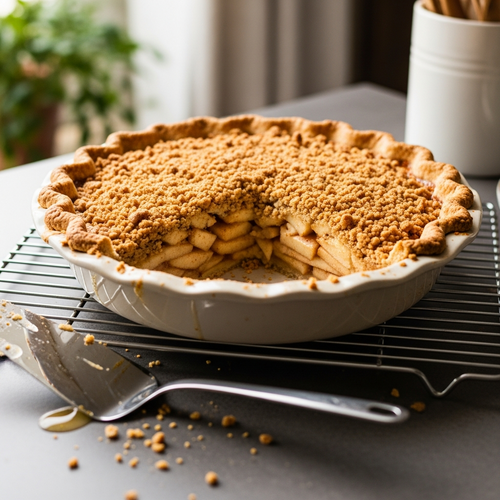
Spoon the apple mixture into the prepared crust, arranging it evenly. If you’re adding the optional topping, quickly mix those ingredients in a small bowl and sprinkle them over the top. Place the pie on a baking sheet (to catch any potential drips) and bake for 35-45 minutes. You’ll know it’s done when the crust is a beautiful golden brown and the filling is bubbly.
Step 6: Let It Cool (The Hardest Part)
This step is crucial. You must let the pie cool on a wire rack for at least 30 minutes, but an hour is even better. This allows the filling to set properly. If you cut into it while it’s hot, you’ll have a delicious, soupy mess. ADHD tip: set a timer on your phone and leave the kitchen. Don’t torture yourself by staring at it.
How To Serve Apple Pie (ADHD-Friendly)
Once your masterpiece has cooled and set, the fun part begins. But even serving food can present challenges for the ADHD brain, mostly around decision fatigue and portion control. So, let’s make a simple, effective plan for how to incorporate this apple pie into your life without it becoming a source of stress.
The pie is designed to be delicious all on its own. The creamy, spiced filling and nutty crust don’t need much help. For your first slice, I recommend trying it just as it is. But if you want to elevate it or fit it into a specific macro goal, we have options. Topping a warm slice with a scoop of plain non-fat Greek yogurt is a fantastic choice. It adds a tangy creaminess and another hit of protein, making it an even more balanced snack.
Here are a few brutally practical, ADHD-friendly ways to serve and manage your apple pie:
- Pre-Portion for Success: Once the pie is completely cool, slice the entire thing. Place each slice in a separate small, clear container. This does two things. First, it eliminates the “friction” of having to get out a knife and plate every time you want a piece. Second, it defines what “one serving” is, helping you avoid the mindless “sliver-after-sliver” grazing that can happen when we’re tired or unfocused.
- Schedule Your Snack: Don’t leave it to chance. Plan when you’re going to eat your pie. Will it be your post-workout meal to replenish glycogen and get in some protein? Or maybe it’s your planned evening dessert that you look forward to all day. By giving it a designated spot in your day, you control the food instead of letting it control you.
- Pair It with Protein: If you’re eating it for dessert but are still a bit short on your daily protein goal, pair it with a small glass of milk or a quick scoop of vanilla protein powder mixed with water or almond milk. This turns your dessert into a final opportunity to hit your macros for the day.
The goal is to make enjoying food simple and automatic. By setting up these small systems, you reduce the number of in-the-moment decisions you have to make, which is a huge win for managing ADHD and staying on track with your fitness goals.
How To Store, Reheat, and Reuse Apple Pie
One of the best things about this apple pie recipe is that it’s fantastic as a meal prep item. It holds up well for several days, meaning you can bake it once and have a healthy, satisfying treat ready to go for the rest of the week. Proper storage is key to making it last and keeping it delicious. For anyone with ADHD, having grab-and-go options is essential for staying consistent when executive function is low.
After the pie has cooled completely, the best place to store it is in the refrigerator. You can either cover the entire pie plate tightly with plastic wrap or foil, or you can follow the pre-portioning tip and store individual slices in airtight containers. In the fridge, the pie will stay fresh and delicious for up to 4 days. An ADHD-friendly hack is to use a small piece of masking tape on the container to write the date you made it. This helps combat the “out of sight, out of mind” phenomenon where food gets lost in the back of the fridge.
When you’re ready to enjoy a slice, you have a few reheating options:
- The Microwave Method: This is the fastest and easiest way. Place a slice on a microwave-safe plate and heat it for about 30-45 seconds. The crust won’t be as crispy, but the filling will be warm and gooey. It’s perfect for when you need a quick comfort food fix.
- The Oven or Air Fryer Method: This is the best method for restoring the pie to its just-baked glory. Heat a slice in the oven, toaster oven, or air fryer at 350°F (175°C) for 5-10 minutes. This will warm the filling through and, most importantly, re-crisp the crust and topping.
- The Cold Method: Honestly, a slice of this apple pie straight from the fridge is also fantastic. The filling is firm and cheesecake-like, making for a refreshing and different experience.
Don’t be afraid to get creative with leftovers. If a slice gets a bit crumbled or you’re just bored of eating it plain, try crumbling it into a bowl of Greek yogurt to create a delicious apple pie parfait. You can even toss a small piece into a blender with vanilla protein powder and almond milk for a decadent-tasting apple pie smoothie.
Easy Swaps & Variations for Apple Pie
The core of our philosophy is flexibility. A plan that shatters the moment you can’t find one specific ingredient is a plan doomed to fail. This apple pie recipe is designed to be adaptable. Life is unpredictable, and your diet should be able to roll with the punches. Whether you need to adjust for dietary restrictions, use what you have on hand, or just want to experiment, here are some simple swaps you can make.
Remember that changing ingredients can affect the texture and baking time, so be prepared to watch it a little more closely if you make a substitution. The goal is to empower you to make this recipe work for your life, not the other way around. Don’t let the “perfect” be the enemy of the “done.”
Here are some of the most common and effective variations:
- Make It Gluten-Free: This recipe is already very close. Just ensure you are using a certified gluten-free oat flour and that your protein powder is gluten-free. Most are, but it’s always good to check the label if you have a sensitivity or celiac disease.
- Try a Different Protein Powder: If you’re dairy-free or vegan, you can substitute the whey with a plant-based protein powder, like a pea or soy isolate blend. Be aware that plant proteins are often more absorbent, so you may need to add an extra tablespoon or two of water to the crust to get the right consistency. A vanilla or cinnamon flavor will work best.
- Swap the Fruit: While it won’t be an “apple pie” anymore, the base of this recipe works wonderfully with other fruits. In the fall, sliced pears are a fantastic substitute. In the summer, a mix of berries (like blueberries and raspberries) would be incredible. You may need to adjust the baking time slightly depending on the water content of the fruit.
- Change the Flour: If you don’t have oat flour, you can easily make your own by blending rolled oats in a high-speed blender until fine. If you’re out of almond flour, you can use more oat flour or try another nut flour like pecan or walnut flour for a different flavor profile.
- Adjust the Spices: Feel free to customize the spice blend to your liking. If you love cardamom, add a pinch. If you want a little more heat, up the ginger. This is your pie, so make it taste the way you want it to.
High-Protein Apple Pie
Description: A guilt-free apple pie recipe packed with protein, designed to satisfy cravings and support fat loss goals for busy people with ADHD.
Prep Time: 20 minutes | Cook Time: 45 minutes
Servings: 8 slices
Macros per Serving | Calories: 220 | Protein: 14g | Fat: 7g | Carbohydrates: 23g
Ingredients
- For the Crust: 1 cup oat flour, 1/2 cup vanilla whey protein powder, 1/4 cup almond flour, 2 tbsp melted coconut oil, 1 tbsp maple syrup, 3-4 tbsp cold water, 1/4 tsp salt.
- For the Filling: 4 medium baking apples, 1/2 cup plain non-fat Greek yogurt, 1/4 cup vanilla whey protein powder, 2 tbsp zero-calorie brown sugar substitute, 1 tbsp lemon juice, 1 tsp ground cinnamon, 1/2 tsp ground nutmeg, pinch of ground ginger.
- For the Topping (optional): 1/4 cup rolled oats, 2 tbsp chopped pecans, 1 tbsp zero-calorie brown sugar substitute, 1/2 tsp ground cinnamon, 1 tbsp melted light butter.
Instructions
- Preheat oven to 375°F (190°C).
- Mix dry crust ingredients. Add wet ingredients and mix until a dough forms. Press into a 9-inch pie plate.
- In a large bowl, toss sliced apples with lemon juice.
- In a separate bowl, whisk together yogurt, protein powder, sweetener, and spices for the filling.
- Pour yogurt mixture over apples and stir to coat. Arrange in the crust.
- Mix topping ingredients and sprinkle over the pie, if using.
- Bake for 35-45 minutes until golden and bubbly.
- Cool on a wire rack for at least 30 minutes before serving to allow the filling to set.
Notes
Letting the pie cool completely is crucial for the filling to set properly. Don’t skip this step!
FAQs About Apple Pie For Weight Loss
Here are some straightforward answers to the most common questions I receive about this apple pie recipe.
Can I really eat this apple pie and still lose weight?
Yes, absolutely. This is the most important question to address because it gets to the heart of what sustainable fat loss is all about. Weight loss is determined by a calorie deficit, meaning you consume fewer calories than your body burns over time. The problem with traditional diets is that they achieve this deficit through extreme restriction, which is miserable and unsustainable, especially for the ADHD brain that craves reward and satisfaction.
This apple pie is designed to fit *within* a calorie deficit without making you feel deprived. Each slice is only around 220 calories, which can easily fit into a daily goal. More importantly, it’s packed with 14 grams of protein and fiber from the oats and apples. This combination keeps you full and satisfied, reducing the likelihood that you’ll snack on other, less healthy foods later. Eating this pie helps you stick to your overall plan by managing cravings and preventing the binge-restrict cycle. It’s a tool for consistency, not a setback.
What makes this a healthy apple pie recipe?
This recipe is considered “healthy” because we’ve made strategic, intelligent swaps to the ingredients to dramatically improve its nutritional profile without sacrificing flavor. A slice of traditional apple pie can have over 400 calories, 50 grams of carbs (mostly sugar), and very little protein. Our version is fundamentally different.
First, we replaced a large portion of the refined white flour in the crust with oat flour, almond flour, and whey protein. This boosts fiber and protein content significantly. Second, the filling’s “sauce” is based on non-fat Greek yogurt instead of butter and sugar. This swap alone slashes hundreds of calories and grams of fat while adding a substantial amount of protein. Finally, we use a zero-calorie brown sugar substitute instead of real sugar, which provides sweetness without the calories or the blood sugar spike. Every ingredient was chosen to make the pie more filling, more nutritious, and better for your fat loss goals.
My apple pie filling was watery, what did I do wrong?
This is a common issue with any fruit pie, and there are usually two main culprits. The first and most likely reason is that the pie was not allowed to cool for long enough. When the pie is hot out of the oven, the filling is molten and very liquid. As it cools, the proteins and starches in the filling set and thicken, creating that perfect sliceable consistency. The urge to cut into a warm pie is strong, but you have to resist. Letting it cool for at least 30-60 minutes is non-negotiable for a firm filling.
The second possibility could be the type of apples you used. Some apple varieties have a much higher water content and break down into a mushy, watery consistency when baked. That’s why we recommend firm baking apples like Granny Smith or Honeycrisp, as they tend to hold their shape and release less liquid. If you followed the recipe and still found it watery, let it cool even longer next time. You can even pop it in the fridge for an hour to help it firm up completely.
Can I make this apple pie without protein powder?
You technically can, but I wouldn’t recommend it, as it would fundamentally change the recipe and defeat its primary purpose. The protein powder plays a crucial role in both the structure and the nutritional content of the pie. In the crust, it replaces a significant amount of flour, creating a tender, cookie-like texture. In the filling, it helps to thicken the Greek yogurt mixture and, of course, adds a huge protein boost.
If you were to omit it, you would need to replace it with other ingredients to get a similar result. For the crust, you’d need to add more flour. For the filling, you might need a thickener like cornstarch. At that point, you’re not making a high-protein apple pie anymore. The whole point of this recipe is to create a dessert that helps you hit your protein macros and stay full. If you don’t like whey, I suggest experimenting with a high-quality, good-tasting plant-based protein powder as a substitute before trying to remove it completely.
How can I make this apple pie recipe even more ADHD-friendly?
I love this question because it’s all about working with our brains. The biggest barrier for cooking with ADHD is often task initiation and executive dysfunction. The best way to combat this is by breaking the recipe down into smaller, more manageable steps and using every shortcut available to you. Don’t feel like you have to be a hero and do everything from scratch.
First, embrace store-bought shortcuts. Buy pre-made oat flour instead of making your own. Buy pre-sliced apples from the produce section to eliminate the peeling and chopping step, which is often the most tedious part. Second, practice “task batching.” You don’t have to make the whole pie at once. Day one: just mix the dry ingredients for the crust and topping and store them in labeled bags. Day two: make the filling and bake the pie. Breaking it down makes the overall process feel much less overwhelming. Finally, use technology. Use a food processor to mix the crust dough in seconds. It saves time and messy cleanup. The goal is to lower the barrier to entry so you can get to the rewarding part: eating the delicious pie.
Try These High-Protein Recipes Next
If you enjoyed this practical approach to a classic dessert, here are a few other recipes you might love.
- High-Protein Chocolate Chip Cookies: The ultimate classic cookie, redesigned with a protein punch to satisfy your sweet tooth and support your goals.
- Macro-Friendly Sugar Cookies: A simple, soft, and delicious sugar cookie recipe that’s easy to make and fits perfectly into a balanced eating plan.
- Unforgettable Apple Pie with Bourbon and Salted Caramel: For a special occasion when you’re looking for a more traditional, indulgent dessert, this recipe is an absolute showstopper.
Building a fit lifestyle is all about finding recipes that you genuinely look forward to eating.