Let’s be honest. For years, I thought chocolate cake was the enemy. When I first set out to lose that 65-70 pounds, my mindset was all-or-nothing. I cut out everything I loved, including my favorite dessert. It was a classic ADHD hyperfocus move: go hard, be perfect, and inevitably burn out.
And I did burn out. Multiple times. The restriction led to intense cravings, which led to weekend binges, which led to guilt and starting the cycle all over again on Monday. It was exhausting and unsustainable. As a single dad trying to build a business and manage my own ADHD, I didn’t have the energy for that kind of battle with food.
The breakthrough came when I shifted my thinking from restriction to strategy. Instead of banning chocolate cake, I asked a different question: “How can I make a chocolate cake that fits my goals?” How could I create a version that crushes cravings, packs in protein, and actually helps me stay on track?
This recipe is the answer. It’s the result of years of experimenting in my own kitchen, first as an unmedicated guy figuring things out, and later refining it after starting meds. It’s rich, moist, and tastes like the real deal, but it’s built to support fat loss and a fit lifestyle. It’s designed for our brains. It’s proof that you don’t have to give up the foods you love to get the results you want.
Consistency beats intensity, every single time.
Skip to My Flexibe Diet Recipe!
Why Chocolate Cake Is Great For Fat Loss
When you hear “chocolate cake” and “fat loss” in the same sentence, it’s natural to be skeptical. We’ve been conditioned to see certain foods as “bad” and off-limits. But at ADHD FIT, we don’t do “bad” foods. We do smart, flexible eating that works with your brain, not against it.
This chocolate cake isn’t just a treat. It’s a strategic tool for sustainable fat loss. The number one reason people fall off their fitness plan is feeling deprived. This recipe solves that. By building in planned, satisfying foods like this, you eliminate the psychological pressure that leads to binge eating. It’s a release valve.
The magic is in the macros. We slash the sugar and fat by using smart swaps like zero-calorie sweetener, non-fat Greek yogurt, and unsweetened applesauce. This dramatically lowers the calorie count per slice compared to a traditional cake. But more importantly, we pack it with protein from both the whey-casein powder and the Greek yogurt.
Protein is the cornerstone of fat loss. It keeps you feeling full and satisfied for hours, which is a game-changer for managing ADHD-driven impulsive snacking. It also requires more energy for your body to digest (the thermic effect of food), giving your metabolism a slight boost. Hitting your protein goals is non-negotiable, and this cake helps you do it in the most enjoyable way possible.
Instead of a sugar-loaded dessert that spikes your blood sugar and leaves you crashing and craving more, you get a balanced slice of cake that stabilizes your energy and crushes your sweet tooth. This is how you build a system where you never feel like you’re on a diet. It’s just how you eat.
Ingredients You’ll Need for Chocolate Cake
Building a great, high-protein chocolate cake comes down to a few smart ingredient choices. We aren’t just removing the bad stuff; we’re actively adding in ingredients that work for our fitness goals. Everything here has a purpose, from adding moisture to boosting protein.
The real star of this recipe is the chocolate whey-casein blend protein powder. This is crucial. Using a blend is much better for baking than using 100% whey. Whey protein can sometimes make baked goods dry and rubbery. The casein in the blend helps retain moisture, resulting in a much better, more cake-like texture. If you want a truly delicious chocolate cake, don’t skip this detail.
We also lean heavily on non-fat plain Greek yogurt and unsweetened applesauce. These two ingredients are a powerhouse combination for replacing oil and butter. They provide incredible moisture, a subtle tang that balances the sweetness, and in the case of Greek yogurt, an extra shot of protein.
Here’s the full list of what you’ll need.
For the High-Protein Chocolate Cake:
- 1 cup (120g) all-purpose flour
- ¾ cup (75g) chocolate whey-casein blend protein powder
- ½ cup (40g) unsweetened cocoa powder – Use a good quality one for a richer chocolate flavor.
- 1 ½ teaspoons baking powder
- ½ teaspoon baking soda
- ¼ teaspoon salt
- 1 cup (240g) non-fat plain Greek yogurt
- ¾ cup granulated zero-calorie sweetener (erythritol or monk fruit blend)
- ½ cup unsweetened applesauce
- 3 large eggs
- 2 teaspoons vanilla extract
- ½ cup hot water or black coffee – The coffee deepens the chocolate flavor without tasting like coffee.
For the Protein Frosting:
- 2 cups (450g) non-fat plain Greek yogurt, strained – Straining is key for a thick, frosting-like consistency.
- 1 small box (1 oz) sugar-free, fat-free instant chocolate pudding mix
- 2-3 tablespoons powdered zero-calorie sweetener, to taste
- 1-2 tablespoons milk of choice (if needed to reach desired consistency)
How To Make Chocolate Cake (Step-By-Step)
Making this chocolate cake is straightforward. We’re not doing anything complicated here. The key is to follow the steps in order and not overthink it. For those of us with ADHD, I highly recommend doing a “mise en place” – get all your ingredients measured and laid out on the counter before you start. This simple act of preparation prevents that mid-recipe panic when you can’t find the vanilla extract.
Step 1: Preheat Oven and Prep Pans
First things first, get your oven preheating to 350°F (175°C). While it’s heating up, prepare two 8-inch round cake pans. You can grease and flour them the traditional way, but my go-to shortcut is to spray them with cooking spray and then line the bottoms with parchment paper. It guarantees the cakes will release easily, which is one less thing to worry about.
Step 2: Combine Dry Ingredients
In a large bowl, add the flour, chocolate protein powder, cocoa powder, baking powder, baking soda, and salt. Use a whisk to mix them together thoroughly. Don’t just stir with a spoon. Whisking helps break up any clumps and, more importantly, ensures the baking powder and baking soda are evenly distributed. This is what helps the cake rise evenly.
Step 3: Combine Wet Ingredients
In a separate, medium-sized bowl, whisk together the Greek yogurt, granulated sweetener, applesauce, eggs, and vanilla extract. Keep whisking until the mixture is completely smooth and there are no streaks of egg or clumps of yogurt left. This should only take about a minute.
Step 4: Mix Wet and Dry
Now, pour the wet ingredients into the bowl with the dry ingredients. Mix them together with a spatula or wooden spoon until they are just combined. The key here is to not overmix. A few small lumps are perfectly fine. Overmixing develops the gluten in the flour, which can lead to a tough, dense cake instead of a light and tender one.
Step 5: Add Hot Liquid
Slowly pour in the hot water or black coffee and stir gently until the batter is smooth. Using hot liquid “blooms” the cocoa powder, which deepens and intensifies the chocolate flavor. The batter will seem quite thin at this point. Don’t worry, that’s exactly what you want.
Step 6: Bake The Cake
Divide the batter evenly between your two prepared pans. Bake for 25-30 minutes. You’ll know they’re done when a toothpick inserted into the center comes out clean or with just a few moist crumbs attached. If it comes out with wet batter, they need a few more minutes.
Step 7: Cool The Cake Layers
This is a critical step. Let the cakes cool in the pans for about 10 minutes. Then, carefully run a knife around the edges and invert them onto a wire rack to cool completely. You absolutely must let them cool completely before you even think about frosting them. Frosting a warm cake is a recipe for a melted, sliding disaster.
Step 8: Make and Apply The Frosting
While the cakes are cooling, make the frosting. In a bowl, whisk the strained Greek yogurt, sugar-free pudding mix, and powdered sweetener until it’s smooth and thick. If it seems too thick, add a tablespoon of milk at a time to thin it out. Once the cakes are cool, place one layer on a plate, spread half the frosting on top, add the second layer, and frost the top and sides with the rest. A quick 30 minutes in the fridge helps it all set beautifully.
How To Serve Chocolate Cake (ADHD-Friendly)
Serving this chocolate cake is where our flexible eating principles really shine. This isn’t a “cheat meal” that sends you into a spiral. It’s a planned part of a balanced, high-protein diet. The key is intention and portion control, which can be a challenge for the ADHD brain’s impulsivity. So, we build a system.
My number one ADHD-friendly tip is to pre-portion the cake. Once the cake has been frosted and has set in the fridge, take it out and slice the entire thing into 12 equal servings. Place each slice in its own small, airtight container. This does two amazing things. First, it completely removes decision fatigue. You don’t have to decide how big of a slice to cut each time. Second, it creates a physical barrier to mindless eating. Grabbing a container is a conscious choice, not an impulsive “I’ll just shave off one more sliver.”
This cake is fantastic on its own, but you can easily level it up to feel even more like a decadent dessert. Here are a few simple ways to serve it that won’t derail your progress:
- With Berries: A handful of fresh raspberries or sliced strawberries on the side adds a burst of freshness, color, and fiber. The tartness of the berries cuts through the richness of the chocolate perfectly.
- A Dollop of Yogurt: Add an extra spoonful of plain Greek yogurt on top. It looks fancy, adds even more protein, and provides a creamy contrast to the cake’s texture.
- With Protein Ice Cream: For a true dessert experience, serve a slice with a small scoop of a low-calorie, high-protein ice cream. This feels incredibly indulgent but can easily fit within your daily macro targets.
By planning how you’ll eat this chocolate cake, you turn it from a potential problem into a powerful tool. It becomes a reliable way to satisfy your sweet tooth, hit your protein goals, and stay consistent on your journey without ever feeling deprived.
How To Store, Reheat, and Reuse Chocolate Cake
Proper storage is key to making this chocolate cake a convenient, long-lasting tool in your meal plan. Because both the cake and the frosting are made with Greek yogurt, it absolutely needs to be stored in the refrigerator. Leaving it out on the counter is not an option.
The best way to store it is in an airtight container. If you’ve pre-portioned the slices as I recommended, you’re already ahead of the game. Just pop those individual containers in the fridge, and they’ll stay fresh and delicious for up to 5 days. If you’re storing the whole cake, a dedicated cake carrier or a large container with a secure lid works perfectly.
For longer-term storage, this chocolate cake freezes beautifully. This is a fantastic ADHD hack for future-proofing your nutrition. When you have a planned treat ready to go, you’re less likely to reach for something off-plan when a craving strikes. Here’s how to do it right:
- Freeze Individual Slices: Place the individual slices on a baking sheet lined with parchment paper. Pop them in the freezer for about an hour, or until firm. This is called a “flash freeze.”
- Wrap Them Up: Once firm, wrap each slice individually in plastic wrap, then place all the wrapped slices into a large freezer-safe bag or container. This double-wrapping prevents freezer burn.
- Label and Date: Use a marker to write the date on the bag. Future you will appreciate it. The cake will be good in the freezer for up to 3 months.
To eat from frozen, simply take out a slice and let it thaw in the refrigerator for a few hours or on the counter for about 30-60 minutes. As for leftovers, if you have a slice that’s a day or two old, try crumbling it up over a bowl of Greek yogurt with some berries. It creates an amazing high-protein “cake parfait” that feels like a totally new and exciting meal.
Easy Swaps & Variations for Chocolate Cake
The best recipes are the ones you can adapt to what you have on hand or what fits your specific dietary needs. This chocolate cake recipe is very flexible. While I recommend making it as written the first time, don’t be afraid to experiment. Consistency is about finding what works for you long-term, and that often means being able to make smart substitutions.
Remember, any changes you make will affect the final macros and texture, so you may need to adjust your expectations slightly. But having options is key to avoiding the all-or-nothing mindset that can derail us. If you’re missing one ingredient, you don’t have to abandon the whole plan; you can just pivot.
Here are some of the most common and reliable swaps and variations you can try for this chocolate cake:
- For a Gluten-Free Version: You can swap the all-purpose flour for a good quality 1-to-1 gluten-free baking flour blend. Look for one that contains xanthan gum, as this helps mimic the structure that gluten normally provides.
- Different Protein Powders: While the whey-casein blend gives the best texture, you can use 100% whey protein if that’s all you have. Just be aware the cake might be slightly drier. You could also experiment with a vanilla protein powder and simply add an extra tablespoon of cocoa powder to maintain the rich chocolate flavor.
- Sweetener Options: Any granulated zero-calorie sweetener that measures like sugar will work. If you’re not concerned about the extra calories and sugar, you can use regular granulated sugar or coconut sugar, but be sure to account for them in your daily totals.
- Flavor Variations: Add a teaspoon of peppermint extract to the batter for a chocolate mint cake. Or, mix a teaspoon of instant espresso powder into the batter along with the hot coffee to make it a mocha cake. You can also fold in some sugar-free chocolate chips before baking for extra texture.
These simple tweaks allow you to keep the recipe fresh and exciting, making it easier to stick with your plan. A sustainable lifestyle is all about having flexible, delicious options that you genuinely enjoy.
High-Protein Chocolate Cake
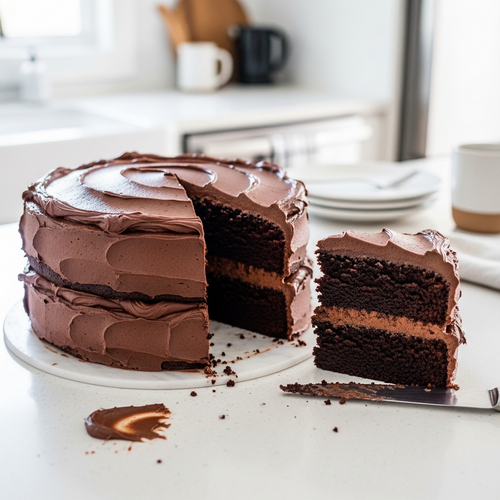
Description: A rich, moist, and secretly healthy chocolate cake that’s packed with protein. It’s the perfect dessert to crush cravings and help you stay on track with your fat loss goals without feeling deprived.
Prep Time: 15 minutes | Cook Time: 30 minutes
Servings: 12 slices
Macros per Serving | Calories: 180 | Protein: 15g | Fat: 5g | Carbohydrates: 20g
Ingredients
- 1 cup (120g) all-purpose flour
- ¾ cup (75g) chocolate whey-casein blend protein powder
- ½ cup (40g) unsweetened cocoa powder
- 1 ½ teaspoons baking powder
- ½ teaspoon baking soda
- ¼ teaspoon salt
- 1 cup (240g) non-fat plain Greek yogurt
- ¾ cup granulated zero-calorie sweetener
- ½ cup unsweetened applesauce
- 3 large eggs
- 2 teaspoons vanilla extract
- ½ cup hot water or black coffee
- For Frosting: 2 cups strained non-fat Greek yogurt, 1 box (1 oz) sugar-free instant chocolate pudding mix, 2-3 tbsp powdered sweetener
Instructions
- Preheat oven to 350°F (175°C) and prep two 8-inch cake pans.
- In a large bowl, whisk together all dry cake ingredients (flour through salt).
- In a separate bowl, whisk together all wet cake ingredients (yogurt through vanilla).
- Pour wet ingredients into dry and mix until just combined. Do not overmix.
- Stir in the hot water or coffee until the batter is smooth and thin.
- Divide batter between pans and bake for 25-30 minutes, or until a toothpick comes out clean.
- Let cakes cool completely on a wire rack.
- While cooling, whisk together all frosting ingredients until smooth and thick.
- Once cakes are cool, assemble and frost the cake. Refrigerate for 30 minutes before serving.
Notes
Using a whey-casein blend protein powder is highly recommended for the best texture. Straining the Greek yogurt for the frosting is essential for a thick, non-runny consistency.
FAQs About Chocolate Cake For Weight Loss
Here are some straightforward answers to the most common questions I receive about this chocolate cake recipe.
Can you really eat this chocolate cake and lose weight?
Yes, absolutely. The idea that you have to eliminate entire food groups to lose weight is a myth. Sustainable fat loss comes down to managing your total daily calorie intake and prioritizing protein. This chocolate cake is specifically designed to fit into that framework. It’s significantly lower in calories, fat, and sugar than a traditional cake, which means a slice can easily fit into your daily calorie budget.
More importantly, its high protein content makes it incredibly satisfying. Protein helps keep you full, reducing the likelihood of overeating later in the day. By having a planned, delicious, and macro-friendly treat like this, you reduce the intense cravings that lead to unplanned binges on much higher-calorie options. It’s about being strategic, not restrictive. This cake is a tool that helps you stay consistent, and consistency is what drives results.
What’s the best protein powder to use for this chocolate cake recipe?
The type of protein powder you use has a big impact on the final texture of the cake. For baking, I strongly recommend a whey-casein blend. Whey protein on its own is fantastic for shakes, but it can absorb a lot of moisture and make baked goods like cakes or brownies come out dry and rubbery. Casein protein is much slower to digest and helps retain moisture, which gives the cake a much more tender and authentic crumb.
If you only have 100% whey protein, you can still make the recipe, but be prepared for a slightly denser and drier result. You might want to add an extra tablespoon or two of Greek yogurt or applesauce to compensate. I would avoid using plant-based protein powders in this specific recipe unless you’re very experienced with them, as they absorb liquid very differently and would require significant adjustments to the other ingredients.
Does this high-protein chocolate cake actually taste good?
This is the most important question, and the answer is a resounding yes. If healthy food doesn’t taste good, you won’t eat it, and the plan fails. I spent a lot of time developing this recipe to make sure it tastes like a genuine treat. The key is using ingredients that add flavor and moisture, not just cut calories. The Greek yogurt and applesauce make the cake incredibly moist, while a good quality cocoa powder provides a deep, rich chocolate flavor.
Using hot coffee in the batter is a baker’s trick that enhances the chocolate notes without making it taste like coffee. The frosting, made from strained Greek yogurt and sugar-free pudding mix, is creamy, tangy, and sweet. It doesn’t taste exactly like a sugary buttercream, but it’s delicious in its own right and complements the cake perfectly. It satisfies the craving for a rich, decadent dessert, which is the entire point.
How can I make this chocolate cake recipe gluten-free?
Making this chocolate cake gluten-free is very simple. The only ingredient you need to swap out is the all-purpose flour. I recommend using a high-quality “cup-for-cup” or “1-to-1” gluten-free all-purpose baking flour. These blends are specifically formulated to replace regular flour in recipes without needing a lot of other adjustments. Look for a blend that contains xanthan gum, as this is crucial for providing the structure and binding that gluten normally would.
You don’t need to change the amount; simply substitute the 1 cup of all-purpose flour with 1 cup of your chosen gluten-free blend. Also, double-check that your baking powder and protein powder are certified gluten-free if you have a serious intolerance or celiac disease. The rest of the ingredients are naturally gluten-free, so it’s a very straightforward conversion that yields a fantastic result.
My chocolate cake came out dry, what did I do wrong?
If your cake turned out dry, there are usually three common culprits. The first and most likely reason is overbaking. Every oven is slightly different, so it’s important to start checking for doneness a few minutes before the recipe states. Use a toothpick, and as soon as it comes out clean or with just a few moist crumbs, the cake is done. Even two or three extra minutes can be the difference between a moist cake and a dry one.
The second reason could be the type of protein powder used. As mentioned earlier, using 100% whey protein instead of a whey-casein blend can lead to a drier texture. Whey absorbs more liquid, so if you’re using it, you may need to add a bit more moisture. The third potential issue is overmixing the batter after combining the wet and dry ingredients. When you overmix, you overdevelop the gluten, which results in a tough and dense cake rather than a light and tender one. Mix only until the ingredients are just combined.
Try These High-Protein Recipes Next
If you enjoyed this flexible and delicious chocolate cake recipe, I have a few others I think you’ll love.
- The Best High-Protein Brownies – Fudgy, dense, and packed with chocolate flavor, these brownies are another perfect way to hit your protein goals while satisfying a sweet craving.
- Easy High-Protein Chocolate Chip Cookies – A classic cookie recipe made macro-friendly. They are soft, chewy, and incredibly simple to make for a quick treat.
- Easy Chocolate Cake Recipe from Scratch – For days when you want a more traditional and indulgent chocolate cake, this recipe is a fantastic, straightforward option.
Building a library of go-to recipes is one of the best ways to ensure you stay consistent on your fitness journey.