If you told me five years ago that I’d be writing a love letter to cottage cheese, I would have laughed. Back then, I was a single dad just starting my weight loss journey, and my relationship with food was complicated. I wanted results, but I also craved comfort foods like bread. That’s where this high-protein cottage cheese bread recipe comes in.
For me, bread was always a trigger food. A slice turned into half a loaf, and the shame spiral would begin. I needed a version that supported my goals, not sabotaged them. I needed something that would crush my cravings, keep me full for hours, and be so easy to make that my ADHD brain couldn’t find an excuse to skip it.
After a lot of trial and error in the kitchen, this recipe was born. It’s packed with protein, made from simple ingredients, and has a satisfying, hearty texture that actually feels like bread. It became a cornerstone of my 65-pound weight loss because it allowed me to enjoy a staple food without the guilt or the blood sugar crash.
This isn’t just another passing trend. This is a practical tool for your fat loss toolkit, designed specifically for those of us who need our nutrition to be simple, sustainable, and delicious. It works with your brain, not against it.
Why Cottage Cheese Bread Is Great For Fat Loss
When it comes to fat loss, food is about 75 percent of the battle. Workouts are important, but what you eat determines your results. This cottage cheese bread is engineered to make that battle easier, especially for those of us with ADHD.
First and foremost, it’s a protein powerhouse. Each slice is loaded with high-quality protein from cottage cheese, eggs, and protein powder. Protein is the king of macros for fat loss because it’s highly satiating. It keeps you feeling full and satisfied for much longer than typical carbs or fats, which directly combats the mindless snacking and intense cravings that can derail our progress.
This recipe also helps with hunger management by stabilizing your blood sugar. Unlike traditional bread made with refined flour, this loaf uses old-fashioned rolled oats. Oats are a slow-digesting carbohydrate, providing sustained energy without the sharp spike and subsequent crash in blood sugar. This means fewer energy slumps and less desire to reach for a sugary pick-me-up in the afternoon.
Finally, it’s all about consistency. The ADHD brain thrives on simple, repeatable systems. You can bake a loaf of this on Sunday and have a reliable, healthy grab-and-go option for breakfast or lunch all week. This reduces decision fatigue, one of the biggest hurdles in sticking to a nutrition plan. Instead of wondering what to eat, you have a delicious, goal-aligned option ready to go. It’s a practical, flexible solution that supports long-term success.
Ingredients You’ll Need for Cottage Cheese Bread
The beauty of this recipe is its simplicity. We’re using a handful of powerful ingredients to create a nutrient-dense loaf that tastes amazing. You won’t find any complicated or hard-to-find items here. Everything is designed for convenience and effectiveness.
The star of the show is, of course, the cottage cheese. It’s what gives the bread its incredible protein content and moist texture without adding a ton of fat. I recommend using a low-fat (1% or 2%) cottage cheese. The most important tip here is to strain any excess liquid or whey before blending. A watery cottage cheese will make your batter too thin and affect the final texture of the loaf.
For the protein powder, I use unflavored casein. Casein is slow-digesting and creates a wonderful, dense texture in baked goods. However, an unflavored plant-based protein powder will also work well. Just be sure it’s a brand you like the taste of, as it will be noticeable. Avoid whey protein for this recipe, as it can sometimes make baked goods dry or rubbery.
Here’s the full list of what you’ll need:
- 1 cup (220g) low-fat cottage cheese, strained of any excess liquid
- 2 large whole eggs
- 4 large egg whites
- 1 ½ cups (150g) old-fashioned rolled oats
- 1/2 cup (50g) unflavored casein or plant-based protein powder
- 2 tsp baking powder
- 1/2 tsp salt
- 1 tbsp ground flaxseed
- Optional: 1-2 tbsp of sunflower or pumpkin seeds for added texture and nutrients
How To Make Cottage Cheese Bread (Step-By-Step)
This recipe is designed to be as straightforward as possible. We’re using a blender to do most of the heavy lifting, which means minimal cleanup and a perfectly smooth batter every time. Remember, perfection isn’t the goal. A “good enough” approach is what leads to consistency.
ADHD Tip: Before you start, pull out every single ingredient and piece of equipment you’ll need. I call this “mise en place,” a fancy term for getting your stuff ready. It prevents that mid-recipe panic when you realize you can’t find the baking powder. It turns a potentially chaotic process into a simple, follow-the-steps assembly line.
Step 1: Preheat and Prep Your Pan
First things first, preheat your oven to 350°F (180°C). While it’s heating up, prepare your 9×5 inch loaf pan. The best way to do this is with parchment paper. Cut a piece that’s long enough to line the bottom and hang over the two long sides. This creates little “handles” that make it incredibly easy to lift the finished loaf out of the pan without it sticking or breaking.
Step 2: Blend the Wet Ingredients
In a high-speed blender, combine the strained cottage cheese, the two whole eggs, and the four egg whites. Make sure your cottage cheese is well-strained to avoid a soggy loaf. Blend these ingredients on high until the mixture is completely smooth and creamy. You shouldn’t see any lumps or curds left.
Step 3: Add the Dry Ingredients
Now, add the rolled oats, unflavored protein powder, baking powder, salt, and ground flaxseed directly into the blender with the wet mixture. Blend everything again until it’s just combined. You want a smooth, thick batter, but be careful not to overmix. A few quick pulses should be enough to incorporate everything.
Step 4: Pour and Bake
Pour the batter into your prepared loaf pan and use a spatula to spread it evenly. If you’re using the optional seeds, sprinkle them over the top now. Bake for 35-45 minutes. You’ll know it’s done when a toothpick inserted into the center comes out clean. If the top starts to get too brown before the inside is cooked, just loosely tent it with a piece of aluminum foil.
Step 5: Cool Completely
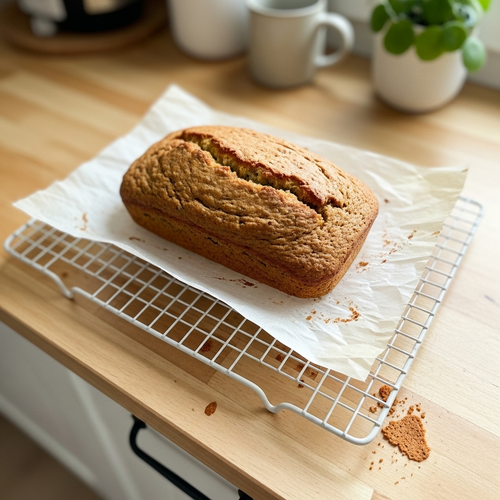
This step is critical! Once it’s out of the oven, let the bread cool in the pan for at least 15 minutes. Then, use your parchment paper handles to lift it out and place it on a wire rack to cool completely. Slicing it while it’s still warm can make it gummy and crumbly. Patience here will pay off with perfect slices.
How To Serve Cottage Cheese Bread (ADHD-Friendly)
Having this cottage cheese bread on hand is one thing, but knowing how to use it without getting bored is key to long-term success. The goal is to make your meals both delicious and frictionless. We want to eliminate as many barriers as possible between you and a healthy choice.
My favorite way to eat this bread is toasted. It gets a lovely golden-brown crust and the inside stays soft and moist. A toaster or a hot pan for a minute on each side works perfectly. From there, the possibilities are endless, but I recommend keeping your toppings simple to avoid decision fatigue.
Remember, the point is to have a reliable, go-to meal component. Don’t overcomplicate it. Find two or three combinations you love and rotate them. This builds a routine that your brain can run on autopilot, saving your precious executive function for more important tasks.
Here are a few of my favorite ADHD-friendly ways to serve it:
- Savory Avocado Toast: Mash half an avocado on a toasted slice and top with everything bagel seasoning. For an extra protein boost, add a fried or scrambled egg on top. This is a complete meal with protein, healthy fats, and complex carbs.
- Sweet & Simple: Toast a slice and top it with a tablespoon of Greek yogurt and a handful of fresh berries. It feels like a treat but is packed with nutrients and keeps you full for hours.
- Quick & Easy Sandwich: Use two slices to make a sandwich with lean protein like sliced turkey or chicken breast, a slice of low-fat cheese, and a handful of spinach. It’s a massive upgrade from a standard sandwich, with double the protein and fiber.
- On-the-Go Snack: Sometimes the simplest way is best. A plain slice, maybe with a thin layer of nut butter, is a fantastic snack to eat in the car or at your desk. It beats a protein bar any day.
These options require minimal prep and use ingredients you likely already have. This makes it easy to stick with your plan, even on days when motivation is at an all-time low.
How To Store, Reheat, and Reuse Cottage Cheese Bread
One of the biggest struggles with ADHD and nutrition is consistency, and a big part of that is dealing with leftovers and preventing food waste. We’ve all had that moment of discovering a science experiment in the back of the fridge. This cottage cheese bread is designed for easy storage and reuse, making your life simpler.
The best way to keep this bread fresh is to store it properly from the start. Once the loaf has cooled completely, I mean completely, you can slice it up. Slicing the entire loaf at once is a great “future you” favor. It removes a step later in the week when you’re busy or low on energy. An unsliced loaf looks nice, but pre-sliced is far more practical for our brains.
Here’s how to handle storing, reheating, and reusing your bread for maximum convenience and freshness:
- Refrigerator Storage: For short-term storage (up to 5-7 days), place the slices in an airtight container or a zip-top bag. I like to put a small piece of paper towel in the container to absorb any excess moisture, which keeps the bread from getting soggy. Store it in the fridge, not on the counter, because of the high egg and dairy content.
- Freezer Storage (The Ultimate ADHD Hack): This bread freezes beautifully. Lay the slices on a baking sheet in a single layer and freeze for about an hour. Once they’re frozen solid, you can transfer them to a freezer-safe bag. This “flash freezing” step prevents them from sticking together, so you can easily grab one or two slices at a time. They’ll last for up to 3 months in the freezer.
- Reheating: To reheat, simply pop a slice (fresh or frozen) into the toaster or a toaster oven until it’s warmed through and slightly crispy on the outside. You can also warm it in a dry non-stick skillet over medium heat for a minute per side. I don’t recommend microwaving, as it can make the bread tough and chewy.
By batch-prepping and freezing, you create a stockpile of healthy options. On a chaotic morning, you’re just 60 seconds away from a perfect piece of toast for your high-protein breakfast. It’s a system that supports you even when your motivation is gone.
Easy Swaps & Variations for Cottage Cheese Bread
Flexibility is key for any sustainable eating plan. Life happens, and you might not always have the exact ingredients on hand. Or maybe you just want to switch things up to keep from getting bored. This cottage cheese bread recipe is very forgiving and easy to adapt. Don’t be afraid to experiment and find what works best for you.
The goal is to create a recipe that fits into your life, not the other way around. If a small change makes it more likely that you’ll actually bake the bread, then it’s a good change. These swaps are designed to accommodate different dietary needs, preferences, and whatever you happen to have in your pantry.
Here are some simple and reliable swaps and variations you can try:
- Make It Gluten-Free: The recipe is already nearly gluten-free. Just ensure you are using certified gluten-free rolled oats to avoid any cross-contamination.
- Protein Powder Swaps: While unflavored casein is my top choice for texture, you can absolutely use an unflavored plant-based blend (like soy, pea, or rice protein) if you’re dairy-free or prefer it. You could even use a vanilla-flavored protein powder for a slightly sweeter loaf that’s perfect for breakfast.
- Flavor Variations: This is where you can get creative. For a savory loaf, try adding a teaspoon of garlic powder, onion powder, and some dried Italian herbs to the batter. For a sweet version, add a teaspoon of cinnamon and a touch of monk fruit or stevia.
- Add-Ins: Feel free to fold in about 1/4 cup of add-ins to the batter before baking. For savory bread, chopped jalapeños and shredded cheddar cheese are fantastic. For a sweeter take, try adding blueberries (fresh or frozen) or some sugar-free chocolate chips.
These small adjustments can make you feel like you’re eating something entirely new, which is a great strategy for beating flavor fatigue and staying on track with your goals.
High-Protein Cottage Cheese Bread
Description: A simple, blender-friendly recipe for a delicious and hearty cottage cheese bread. It’s packed with protein and fiber to keep you full for hours, making it the perfect tool for fat loss and a healthy lifestyle.
Prep Time: 10 minutes | Cook Time: 40 minutes
Servings: 10 slices
Macros per Serving | Calories: 120 | Protein: 12g | Fat: 3g | Carbohydrates: 11.5g
Ingredients
- 1 cup (220g) low-fat cottage cheese, strained
- 2 large whole eggs
- 4 large egg whites
- 1 ½ cups (150g) old-fashioned rolled oats
- 1/2 cup (50g) unflavored casein or plant-based protein powder
- 2 tsp baking powder
- 1/2 tsp salt
- 1 tbsp ground flaxseed
- Optional: 1-2 tbsp of sunflower or pumpkin seeds
Instructions
- Preheat oven to 350°F (180°C) and line a 9×5 inch loaf pan with parchment paper.
- In a blender, combine strained cottage cheese, whole eggs, and egg whites. Blend until smooth.
- Add oats, protein powder, baking powder, salt, and flaxseed to the blender. Blend again until just combined.
- Pour the batter into the prepared pan and spread evenly. Top with seeds if using.
- Bake for 35-45 minutes, or until a toothpick inserted into the center comes out clean.
- Let cool in the pan for 15 minutes before transferring to a wire rack to cool completely before slicing.
Notes
Straining the cottage cheese is a key step for the best texture. Letting the loaf cool completely is essential for clean slices.
FAQs About Cottage Cheese Bread For Weight Loss
Here are some straightforward answers to the most common questions I receive about this cottage cheese bread recipe.
What does cottage cheese bread taste like?
This is probably the number one question people have. Let’s be clear: it doesn’t taste exactly like a fluffy, airy loaf of traditional white bread, and that’s a good thing. It has a unique flavor and texture that is delicious in its own right. The taste is very mild and slightly savory, not overly “cheesy” at all. Blending the cottage cheese makes it smooth and creamy, so you get the protein and moisture without the curd-like texture some people dislike.
The texture is dense, moist, and hearty, almost like a very thick oatmeal bake or a dense sourdough. It’s incredibly satisfying and holds up well to toasting, which gives it a fantastic crispy exterior while the inside stays soft. The flavor is neutral enough to be a perfect canvas for both sweet and savory toppings, from avocado and eggs to Greek yogurt and berries.
Can I make this cottage cheese bread without protein powder?
You can, but it will change the nutritional profile and texture significantly. The protein powder serves two main functions in this recipe. First, it adds a substantial protein boost, which is a key reason this bread is so effective for fat loss and hunger management. Removing it will lower the protein per slice quite a bit.
Second, it helps with the structure and texture of the loaf, acting as a sort of flour. If you omit it, you’ll need to replace it with another dry ingredient to get the right batter consistency. You could try replacing the 1/2 cup of protein powder with an additional 1/2 cup of rolled oats (or oat flour), or perhaps something like almond flour. The result will be a bread that is less protein-dense and likely a bit more moist or gummy. I recommend keeping it in if your primary goal is maximizing protein intake.
Why did my cottage cheese bread turn out gummy or wet?
This is the most common issue people run into, and it almost always comes down to one of two things: excess moisture in the batter or not letting it cool completely. First, it is absolutely critical to strain your cottage cheese. Different brands have different amounts of liquid (whey). Pour your cottage cheese into a fine-mesh sieve and press gently with a spoon to remove as much liquid as possible before measuring and blending.
The second culprit is slicing it too soon. I know it’s tempting to cut into a fresh loaf right out of the oven, but this bread needs time to set as it cools. The starches and proteins firm up during the cooling process. If you slice it while it’s still warm, the inside will be dense and gummy. You must let it cool on a wire rack until it is at or near room temperature for the best texture and clean, firm slices.
Is cottage cheese bread healthy for a fat loss diet?
Yes, absolutely. This specific cottage cheese bread recipe is designed with fat loss principles in mind. Each slice has a fantastic macro ratio, with high protein, moderate complex carbohydrates, and low fat. This combination is ideal for keeping you full and satisfied, which helps you maintain a calorie deficit without feeling deprived.
Unlike store-bought bread, which is often made with refined flour and added sugars, this loaf is made from whole-food ingredients like oats, eggs, and cottage cheese. The fiber from the oats and flaxseed aids in digestion and provides sustained energy release, preventing the blood sugar spikes that can lead to cravings. It’s a nutrient-dense food, meaning you get a lot of nutritional value for the calories consumed, which is the cornerstone of any effective and healthy fat loss plan.
Can I make this cottage cheese bread in an air fryer?
While I developed this recipe for a conventional oven, you could likely adapt it for an air fryer, especially if you have a larger model with baking accessories. You would need a small loaf pan that fits inside your air fryer basket. The main challenge will be adjusting the cooking time and temperature, as air fryers cook much faster and more intensely than ovens.
I would recommend starting with a lower temperature, around 320°F (160°C), to ensure the inside cooks before the outside burns. You’ll also need to check on it more frequently. It would likely take around 20-25 minutes, but you’d need to use the toothpick test to be sure. It might take a bit of experimentation to get it right, but it’s definitely possible if you’re a fan of air fryer baking.
Try These High-Protein Recipes Next
If you enjoyed this recipe and are looking for more simple, high-protein meals that work with your ADHD brain, I think you’ll love these.
- High-Protein Banana Bread: A delicious and healthy take on a classic comfort food, perfect for a satisfying breakfast or snack.
- 2-Minute Protein Pancakes: The fastest, easiest way to make fluffy, protein-packed pancakes to start your day right.
- Simple Protein French Toast: Turn any bread into a muscle-building meal that tastes like a weekend treat.
Building a collection of reliable, go-to recipes is the secret to staying consistent and achieving your fitness goals.