I have a complicated history with green bean casserole. For years, it was a holiday-only food, a symbol of a “cheat day.” It was delicious, comforting, and completely off-limits for the other 360-some days of the year. When I started my fat loss journey, that all-or-nothing mindset was one of the first things I had to tackle. The ADHD brain loves extremes, but sustainable fat loss lives in the middle ground.
This dish represents that middle ground. It’s the result of me refusing to believe that my favorite comfort foods had to be abandoned to get fit. I knew there had to be a way to re-engineer this classic side dish into something that would support my goals, not sabotage them. I wanted the creamy texture, the savory flavor, and that crunchy topping, but without the processed ingredients and empty calories of the traditional version.
This isn’t just a “healthy” recipe. This is a brutally practical, ADHD-friendly recipe. It was designed to manage hunger, provide real nutrients, and taste so good you’ll forget it’s helping you lose fat. I developed this version of a high-protein green bean casserole to prove that you can build the body you want while still eating the food you love. It’s about working with your brain, not against it, and that starts in the kitchen.
This is a cornerstone of the ADHD FIT philosophy. We don’t eliminate; we upgrade. We don’t restrict; we strategize. This casserole is proof of that concept in action.
Skip to My Flexibe Diet Recipe!
Why Green Bean Casserole Is Great For Fat Loss
Let’s be direct. The traditional green bean casserole, made with canned cream-of-something soup and fried onions, is not your friend on a fat loss journey. It’s often high in sodium, unhealthy fats, and processed ingredients that can spike your cravings and leave you feeling hungry an hour later. This recipe flips the script entirely by focusing on our core principles: protein first, hunger management second.
The first major upgrade is the sauce. We ditch the canned soup and build a creamy, savory sauce from a base of non-fat Greek yogurt. This is a game-changer. Greek yogurt provides a significant protein boost, which is the most satiating macronutrient. More protein means you feel fuller for longer on fewer calories, making it easier to stay in a calorie deficit without feeling deprived.
Next, we focus on whole-food ingredients. Fresh green beans are the star, providing fiber and micronutrients. Fiber slows digestion, further contributing to satiety and stabilizing blood sugar levels. This helps prevent the energy crashes that can lead to reaching for sugary snacks. We also use real mushrooms and onions to build a deep, rich flavor base, proving you don’t need mysterious canned ingredients to make something delicious.
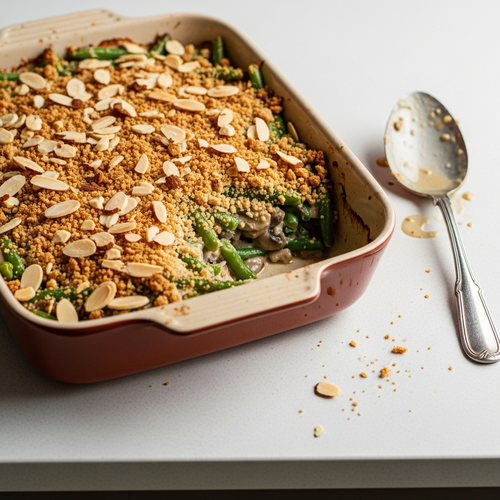
Finally, we reinvent the topping. Instead of deep-fried onions, we use a combination of almond flour, sliced almonds, and Parmesan cheese. This provides healthy fats and a bit more protein, delivering that satisfying crunch without the empty calories. Every single ingredient in this green bean casserole is chosen with a purpose: to maximize flavor and nutrition while supporting your fat loss goals. It’s a perfect example of how strategic swaps can turn a diet-wrecker into a powerful tool for your fitness journey.
Ingredients You’ll Need for Green Bean Casserole
Building a healthier, high-protein green bean casserole is all about smart ingredient choices. We’re not using anything complicated or hard to find. These are simple, whole-food ingredients that work together to create a dish that’s both nutritious and incredibly satisfying. Every item on this list has a specific role in hitting our macros and flavor goals.
The undisputed star of this recipe overhaul is the plain non-fat Greek yogurt. This is our secret weapon. It replaces the traditional canned condensed soup, slashing the fat and sodium content while dramatically increasing the protein. It creates a thick, tangy, and wonderfully creamy sauce that forms the backbone of the entire casserole. Make sure you get plain, non-fat yogurt to keep the macros in check. The fat-free versions work just as well for creating a creamy texture once combined with the other sauce ingredients.
Using fresh green beans is also a critical choice. While frozen can work in a pinch, fresh green beans provide a superior tender-crisp texture that canned beans simply can’t match. They hold up better during baking and offer more nutritional value. Similarly, cremini mushrooms offer a deeper, earthier flavor than standard white button mushrooms, adding a layer of complexity to the sauce. These small details in quality make a big difference in the final product.
- 2 lbs fresh green beans, trimmed and cut into 2-inch pieces
- 8 oz cremini mushrooms, sliced
- 1 medium yellow onion, finely chopped
- 2 cloves garlic, minced
- 1 cup plain non-fat Greek yogurt
- 1/2 cup unsweetened almond milk
- 1/4 cup grated Parmesan cheese
- 2 tbsp all-purpose flour
- 1 tbsp olive oil
- 1 tsp soy sauce, low sodium
- 1/2 tsp black pepper, freshly ground
- 1/4 tsp nutmeg, ground
For the Topping:
- 1/2 cup almond flour
- 1/4 cup sliced almonds
- 2 tbsp grated Parmesan cheese
- 1 tbsp melted light butter or olive oil
- 1/4 tsp garlic powder
- Pinch of salt and pepper
How To Make Green Bean Casserole (Step-By-Step)
One of my rules for ADHD-friendly cooking is to break things down into simple, manageable steps. This process isn’t complicated, and we can even use a technique called “task batching” to make it feel less overwhelming. Do all your chopping first: trim the beans, slice the mushrooms, chop the onion, mince the garlic. Getting the prep out of the way means you can focus on the cooking process without scrambling.
Step 1: Preheat Oven and Blanch the Green Beans
First things first, get your oven preheating to 375°F (190°C). While it heats up, bring a large pot of salted water to a rolling boil. This next step, blanching, is crucial for a great casserole. Add your trimmed green beans to the boiling water for 5-6 minutes. You want them tender but still with a slight bite. Immediately scoop them out and plunge them into a bowl of ice water. This “shocks” them, stopping the cooking process instantly and locking in that vibrant green color. Nothing is worse than a mushy, olive-drab green bean casserole.
Step 2: Prepare the Topping
While the beans are blanching, you can multitask by mixing the topping. This is a perfect small task to complete while waiting. In a small bowl, combine the almond flour, sliced almonds, Parmesan cheese, melted butter (or olive oil), garlic powder, salt, and pepper. Use a fork to mix it all together until it looks like coarse, damp sand. Then, just set it aside. Done.
Step 3: Build the Mushroom Sauce Base
In a large skillet or a Dutch oven, heat your olive oil over medium heat. Add the chopped onion and let it cook until it’s soft and translucent, which usually takes about 5-7 minutes. Then, add the sliced mushrooms. Don’t rush this part. Let the mushrooms cook down until they release all their water and start to get some nice brown color on them. This concentrates their flavor. Once browned, stir in the garlic and cook for just one more minute until you can smell it.
Step 4: Thicken the Sauce and Make it Creamy
Sprinkle the all-purpose flour over the mushroom and onion mixture. Stir it constantly for about a minute. This cooks out the raw flour taste and creates a “roux,” which will thicken our sauce. Now, slowly whisk in the almond milk and soy sauce. Keep whisking until it’s smooth and free of lumps. Let it simmer for a couple of minutes until it noticeably thickens. Here’s the key: remove the skillet from the heat *before* adding the Greek yogurt. If the sauce is too hot, the yogurt can curdle. Stir in the yogurt, Parmesan, black pepper, and nutmeg until it’s all smooth and combined.
Step 5: Assemble and Bake
Make sure your blanched green beans are well-drained, then gently fold them into your creamy mushroom sauce. Coat every bean. Transfer this glorious mixture into a 9×13 inch baking dish and spread it out evenly. Sprinkle the topping you made earlier all over the surface. Bake for 20-25 minutes. You’ll know it’s done when the sauce is bubbly around the edges and the topping is a beautiful golden brown. Let it rest for a few minutes before diving in.
How To Serve Green Bean Casserole (ADHD-Friendly)
Serving this green bean casserole is all about making it fit into a sustainable, fat-loss-oriented lifestyle. For many of us with ADHD, decision fatigue is a real problem, especially around meal times. The best way to combat this is to have a simple, repeatable plan. This casserole isn’t just a side dish; it can be the foundation of a perfectly balanced meal.
My go-to strategy is to pair it with a lean protein source. Think of it as building a “plate template.” A generous portion of this casserole, a 4-6 ounce serving of grilled chicken breast, baked cod, or lean turkey, and you have a complete meal. It hits your protein goals, provides filling fiber from the vegetables, and satisfies that craving for comfort food. This removes the guesswork. You don’t have to wonder what to eat; you just assemble your pre-planned plate.
Here are a few ADHD-friendly tips for incorporating this dish into your week:
- Meal Prep Power: When you make the casserole, immediately portion it out into individual containers. Pair each portion with your chosen protein right then and there. Now you have several grab-and-go meals ready for the week. This completely eliminates the friction of having to cook or decide what to eat on a busy day.
- Visual Cues: Store the pre-portioned meals at eye-level in your fridge. For ADHD brains, “out of sight, out of mind” is a powerful force. If you can see your healthy, prepped meals the moment you open the door, you are far more likely to eat them instead of ordering takeout.
- Flexible Pairing: While chicken and fish are great, don’t be afraid to mix it up. This casserole is fantastic alongside a couple of hard-boiled eggs for a quick lunch, or even with a scoop of cottage cheese to further boost the protein content. Flexibility prevents boredom.
The goal is to make healthy eating the path of least resistance. By planning ahead and pairing this versatile casserole with simple proteins, you create an easy system that supports your goals without requiring a ton of daily mental energy. It’s about building a structure that allows you to thrive.
How To Store, Reheat, and Reuse Green Bean Casserole
Leftovers are a secret weapon for anyone on a fitness journey, especially for those of us with ADHD. Having a delicious, healthy meal ready to go saves time, money, and precious executive function. Storing and reheating this green bean casserole correctly ensures that it tastes just as good on day three as it did on day one.
The key to good storage is an airtight container. Once the casserole has cooled down to room temperature, transfer it to your containers and get it into the refrigerator promptly. Stored properly, it will stay fresh and delicious for up to 4 days. This makes it perfect for a Sunday meal prep session that provides healthy sides or lunches for the first half of the week.
When it comes to reheating, you have a couple of options depending on how much time you have:
- Oven (Best for Texture): For the best results, especially to re-crisp the topping, the oven is your best bet. Place the desired portion in an oven-safe dish and heat at 350°F (175°C) for 15-20 minutes, or until warmed through. You can even place it under the broiler for a minute at the end to get the topping extra crunchy.
- Microwave (Fastest Option): On low-motivation or time-crunched days, the microwave is perfectly fine. Place a serving on a microwave-safe plate and heat it in 1-minute increments, stirring in between, until it’s hot. The topping won’t be as crisp, but the flavor will still be fantastic.
- Freezer Hack: Yes, you can freeze it! Assemble the entire casserole but do not bake it. Cover it tightly with a layer of plastic wrap and then a layer of aluminum foil. It can be frozen for up to 2 months. When you’re ready to eat, let it thaw in the refrigerator overnight and then bake as directed in the original recipe, adding about 10-15 extra minutes to the baking time.
Don’t be afraid to get creative with the leftovers. You can chop up some leftover grilled chicken and stir it directly into the casserole before reheating to create a complete, one-dish meal. I’ve also used it as a topping for baked potatoes. The goal is to make your life easier, and having versatile leftovers on hand is a huge step in that direction.
Easy Swaps & Variations for Green Bean Casserole
One of our core principles at ADHD FIT is that flexible eating wins. A recipe is a blueprint, not a rigid set of laws. Life happens. You might not have every single ingredient, or you might need to adjust for dietary preferences. This green bean casserole recipe is incredibly forgiving and easy to adapt. The goal is consistency, not perfection, so use what you have to make it work for you.
Don’t let a missing ingredient stop you from making a healthy meal. Many of the components here have simple, practical substitutes that will still yield a fantastic result. This is about reducing friction and making it easier to stick to your plan, even when things aren’t perfect.
Here are some simple swaps and variations you can try:
- For a Gluten-Free Version: The only gluten in this recipe comes from the 2 tablespoons of all-purpose flour used to thicken the sauce. You can easily substitute this with a gluten-free all-purpose blend or even 1 tablespoon of cornstarch. If using cornstarch, mix it with a little cold almond milk first to make a slurry before adding it to the skillet to prevent lumps.
- Bean Variations: While fresh green beans are best for texture, you can absolutely use frozen green beans to save time and money. Just make sure to thaw them and pat them dry before using them to avoid a watery casserole. I would advise against canned green beans as they tend to be too soft and salty.
- Protein Boost: To turn this from a side dish into a main course, stir in 2 cups of cooked, shredded rotisserie chicken or cooked ground turkey into the sauce along with the green beans before baking. It’s a simple way to create a complete, high-protein meal.
- Mushroom Swaps: I love the flavor of cremini mushrooms, but standard white button mushrooms or sliced portobellos will work just as well. If you’re not a mushroom fan, you can leave them out and add extra onion or even some finely chopped celery for a different flavor profile.
- Dairy-Free Option: The Greek yogurt and Parmesan are key to the flavor, but you can experiment with dairy-free alternatives. A plain, unsweetened almond or coconut-based yogurt can replace the Greek yogurt, and nutritional yeast can be used in place of Parmesan to add a cheesy, umami flavor.
Remember, the best healthy recipe is the one you actually make. Use these variations to adapt to your kitchen and your needs. The important part is getting a delicious, nutrient-dense meal on the table that keeps you on track with your goals.
High-Protein Green Bean Casserole
Description: A healthy, high-protein take on the classic comfort dish. This green bean casserole uses Greek yogurt for a creamy sauce and a crunchy almond topping, making it a perfect side for a fat-loss lifestyle.
Prep Time: 15 minutes | Cook Time: 25 minutes
Servings: 8
Macros per Serving | Calories: 200 | Protein: 8.5g | Fat: 13g | Carbohydrates: 15g
Ingredients
- 2 lbs fresh green beans, trimmed and cut
- 8 oz cremini mushrooms, sliced
- 1 medium yellow onion, finely chopped
- 2 cloves garlic, minced
- 1 cup plain non-fat Greek yogurt
- 1/2 cup unsweetened almond milk
- 1/4 cup grated Parmesan cheese
- 2 tbsp all-purpose flour
- 1 tbsp olive oil
- 1 tsp soy sauce, low sodium
- 1/2 tsp black pepper, freshly ground
- 1/4 tsp nutmeg, ground
- For the Topping:
- 1/2 cup almond flour
- 1/4 cup sliced almonds
- 2 tbsp grated Parmesan cheese
- 1 tbsp melted light butter or olive oil
- 1/4 tsp garlic powder
- Pinch of salt and pepper
Instructions
- Preheat oven to 375°F (190°C). Blanch green beans in boiling salted water for 5-6 minutes, then transfer to an ice bath. Drain well.
- In a small bowl, mix all topping ingredients until combined. Set aside.
- In a large skillet over medium heat, heat olive oil and cook onion until soft. Add mushrooms and cook until browned. Stir in garlic for 1 minute.
- Sprinkle flour over the vegetables, stir for 1 minute. Gradually whisk in almond milk and soy sauce until smooth and thickened.
- Remove from heat. Stir in Greek yogurt, Parmesan, pepper, and nutmeg. Fold in the blanched green beans.
- Transfer mixture to a 9×13 inch baking dish. Sprinkle evenly with the topping.
- Bake for 20-25 minutes, until bubbly and the topping is golden brown.
Notes
Ensure the skillet is removed from the heat before adding the Greek yogurt to prevent it from curdling. For an even bigger protein boost, add 2 cups of shredded rotisserie chicken.
FAQs About Green Bean Casserole For Weight Loss
Here are some straightforward answers to the most common questions I receive about this green bean casserole recipe.
How do I prevent my green bean casserole from being watery?
A watery casserole is a common problem, but it’s completely avoidable with a few key techniques. The primary culprit of excess moisture is the vegetables, specifically the green beans and mushrooms. If you’re using fresh green beans, the blanching step is essential not just for color and texture, but for controlling water content. After shocking them in the ice bath, you must drain them thoroughly. I like to spread them out on a clean kitchen towel or paper towels and pat them dry to remove as much surface water as possible before adding them to the sauce.
The second source of water is the mushrooms. It is critical to cook the mushrooms properly. When you first add them to the hot pan, they will start to release a lot of liquid. You need to continue cooking them, stirring occasionally, until all of that liquid has evaporated and the mushrooms themselves start to brown and caramelize. This process concentrates their flavor and eliminates the water that would otherwise thin out your sauce. Rushing this step is the most common mistake that leads to a soupy result. Taking the extra 5-8 minutes here makes all the difference in the final consistency of your dish.
Can I make this green bean casserole ahead of time?
Absolutely. This recipe is fantastic for meal prep and is easily made ahead, which is a lifesaver for busy weeknights or holiday planning. For the ADHD brain, reducing the number of tasks you have to do on a given day is a huge win. You have two main options for prepping this dish in advance. The first is to fully assemble the casserole—prepare the sauce, mix in the green beans, and place it in your baking dish—but do not add the topping. Cover the dish tightly with plastic wrap or a lid and store it in the refrigerator for up to 2 days.
When you’re ready to bake, remove it from the fridge, sprinkle the prepared topping over the surface, and bake as directed. You may need to add about 5-10 minutes to the total baking time since it will be starting from a cold temperature. The second option is to prepare the components separately. You can blanch the green beans and make the mushroom sauce, storing them in separate airtight containers in the fridge. The topping can also be mixed and stored separately. Then, on the day of serving, all you have to do is combine, top, and bake. This keeps the components as fresh as possible.
Is this green bean casserole recipe keto-friendly?
As written, this recipe is not strictly ketogenic due to the carbohydrates from the green beans, onion, and the all-purpose flour used as a thickener. Green beans are considered a non-starchy vegetable, but they do contain more carbs than leafy greens, and a ketogenic diet is typically very restrictive, often under 20-30 grams of net carbs per day. The flour adds a few extra carbs as well. However, this recipe is significantly lower in carbohydrates than a traditional green bean casserole and can easily be modified to be more keto-friendly.
To make a keto version, you would need to make a couple of key substitutions. First, replace the 2 tablespoons of all-purpose flour with a keto-friendly thickener like xanthan gum. You would only need about 1/4 to 1/2 teaspoon of xanthan gum to thicken the sauce effectively. Second, you would want to be mindful of your portion size to ensure the carbs from the green beans and onion fit within your daily macro goals. While it might not be a zero-carb dish, a keto-modified version of this recipe can certainly fit into a low-carb or ketogenic lifestyle much better than the original.
Can I use frozen or canned green beans for this casserole?
This is one of the most common questions, and the answer comes down to managing expectations for the final texture. For the absolute best result, with a tender-crisp texture, fresh green beans are the superior choice. However, we live by the rule of “brutally practical,” and that means using what’s accessible. Frozen green beans are an excellent and convenient substitute. Simply thaw them completely and pat them very dry with paper towels to remove excess moisture before adding them to the sauce. You can skip the blanching step if you use frozen beans.
I would strongly recommend avoiding canned green beans for this recipe. Canned beans are pressure-cooked during the canning process, which leaves them very soft and often with a dull, olive-green color. They will not hold up to being baked in the casserole and will result in a mushy texture. They also tend to have a much higher sodium content. In a pinch, if canned beans are all you have, be sure to rinse them very well and reduce or eliminate any other added salt in the recipe, but be prepared for a much softer final product.
What protein can I add to this green bean casserole to make it a full meal?
Turning this side dish into a complete, balanced meal is one of the best ways to use it, especially for easy weeknight dinners. The goal is to add a significant source of lean protein without overpowering the flavors of the casserole. The easiest and most versatile option is cooked chicken. You can use shredded rotisserie chicken for ultimate convenience, or dice and cook a couple of chicken breasts to stir in. About 2-3 cups of cooked chicken is a good amount for the full recipe.
Another fantastic option is lean ground turkey or ground chicken. Simply brown the ground meat along with the onions at the beginning of the recipe, breaking it up with a spoon, and then proceed with the recipe as written. This incorporates the protein seamlessly into the dish. For a non-poultry option, browned lean ground beef or even some crumbled breakfast sausage can add a rich, savory flavor that complements the creamy sauce beautifully. Adding a protein source makes this a true one-pan meal that hits all your macros and keeps you full and satisfied for hours.
Try These High-Protein Recipes Next
If you enjoyed this recipe, here are a few other comfort food classics that I’ve re-engineered for a fit lifestyle.
- High-Protein Mac and Cheese: A creamy, cheesy, and satisfying mac and cheese that uses a similar Greek yogurt and cottage cheese base to pack in the protein.
- Healthy High-Protein Lasagna: This recipe delivers all the comforting layers of classic lasagna but with smart swaps to boost protein and cut down on calories.
- Easy Green Bean Casserole Recipe: For comparison, check out this more traditional take on the classic dish to see another delicious way to prepare it.
Building a healthy lifestyle is all about finding sustainable recipes you genuinely love to eat.