Hummus used to be one of those foods I filed under “healthy but useless.” I’d eat it with some veggies, feel virtuous for about ten minutes, and then immediately raid the pantry for something that would actually fill me up. For someone with ADHD, that cycle of unsatisfying snacks is a fast track to derailing your entire day of healthy eating.
When I was deep in my 70-pound weight loss journey, I realized the problem wasn’t the hummus itself. The problem was that most recipes didn’t do the one thing I needed them to do: manage my hunger. They were mostly carbs and fat, with very little protein to keep me full.
I knew if I wanted to keep this incredibly easy and tasty snack in my life, I had to rebuild it from the ground up. My goal was simple. It needed to be creamy, delicious, and packed with enough protein to actually quiet the snack monster in my brain for more than a few minutes.
This high-protein hummus recipe is the result. It became an absolute staple for me, both before and after I started ADHD medication. It’s my go-to for battling afternoon cravings, and it’s so simple you can make it even on days when your executive function is completely shot.
Skip to My Flexibe Diet Recipe!
Why This Hummus Is Great For Fat Loss
When it comes to fat loss, food is about 75 percent of the battle. The single biggest factor is managing your hunger so you can consistently stay in a calorie deficit without feeling miserable. This recipe is specifically engineered to do just that, built on the core principles we follow at ADHD FIT.
Our philosophy is protein first, hunger management second. We achieve this here by making one critical swap. Instead of loading up on olive oil like traditional hummus recipes, we use non-fat Greek yogurt as the base for creaminess. This single change dramatically shifts the macros, slashing the overall calories and fat while adding a massive protein boost.
Protein is the king of macros for satiety. It keeps you feeling fuller for longer, which reduces the urge to mindlessly snack between meals. For the ADHD brain, which often seeks dopamine through food, having a satisfying, high-protein option on hand is a powerful tool to prevent impulsive choices.
We also keep the good stuff. Chickpeas provide fiber, which slows down digestion and helps stabilize blood sugar levels, preventing the energy crashes that can trigger cravings. A small amount of tahini and extra virgin olive oil provides healthy fats, which are essential for flavor and hormone health. This combination of high protein, high fiber, and healthy fats makes this hummus a powerhouse for sustainable fat loss.
It’s the definition of flexible eating. You get a creamy, delicious dip that feels like a treat, but every bite is working toward your goals. It helps you stay consistent, and consistency always beats short-term intensity.
Ingredients You’ll Need for Hummus
One of the best things about this recipe is its simplicity. We rely on pantry staples and a few fresh ingredients. No need for a complicated shopping list, which is always a win on low-motivation days. The real magic comes from how we combine them.
Here’s exactly what you’ll need:
- 1 (15-ounce) can chickpeas, no salt added
- 1/2 cup plain non-fat Greek yogurt
- 2 tablespoons tahini
- 2 tablespoons fresh lemon juice
- 1 tablespoon extra virgin olive oil
- 1-2 cloves garlic, minced
- 1/2 teaspoon ground cumin
- 1/4 teaspoon smoked paprika, plus more for garnish
- 1/4 teaspoon salt, or to taste
- 2-4 tablespoons aquafaba (liquid from the can of chickpeas) or water
- Optional garnish: fresh parsley, chopped
The key ingredient that completely transforms this recipe is the plain non-fat Greek yogurt. This is our secret weapon. It provides that ultra-creamy, whipped texture you get in restaurant-style hummus but without all the oil. It also adds a significant amount of protein, which is the entire point. I prefer using a thick Greek yogurt like Fage or Chobani for the best results.
A few other notes on ingredients. Using canned chickpeas makes this recipe incredibly fast and convenient. Just be sure to reserve the liquid from the can, the aquafaba. It’s the perfect thinning agent to get a silky-smooth consistency. And please, use fresh lemon juice. The bottled kind just doesn’t have the same bright flavor and can sometimes taste metallic. It’s a small step that makes a huge difference in the final product.
How To Make Hummus (Step-By-Step)
I’m a big believer in brutally practical systems, and this recipe is as practical as it gets. You are less than ten minutes away from having a healthy, delicious snack ready to go. The key is a good food processor or a high-speed blender. It does all the heavy lifting to create that signature creamy texture.
Step 1: Prep Your Chickpeas
First, drain your can of chickpeas over a bowl to catch that precious liquid, the aquafaba. We’ll be using it later. An ADHD-friendly tip I use is to place my small bowl directly into the colander in the sink before I open the can. That way, I physically can’t forget to save it. Once drained, give the chickpeas a good rinse under cold water. This washes away any excess salt and starch, leading to a cleaner taste.
Step 2: Combine Everything
This is the easy part. Put the rinsed chickpeas, Greek yogurt, tahini, fresh lemon juice, olive oil, minced garlic, cumin, smoked paprika, and salt into the bowl of your food processor or blender. There is no special order required. Just dump it all in. This is perfect for days when you don’t have the mental energy for complex steps.
Step 3: Blend Until Thick
Secure the lid and blend on high for about one minute. The mixture will come together into a very thick, almost chunky paste. Don’t worry, this is exactly what you want to see. Scrape down the sides of the bowl with a spatula to make sure everything is getting incorporated.
Step 4: Stream in Liquid for Creaminess
Now for the magic. With the blender or food processor running on low, slowly stream in 2 tablespoons of the reserved aquafaba. Once it’s incorporated, turn the speed up to high and let it blend for a full 2 to 4 minutes. This is not the time to be impatient. The extended blending time whips air into the hummus, making it incredibly light and smooth. If it’s still thicker than you like, add more aquafaba, one tablespoon at a time, until it’s perfect.
Step 5: Taste and Adjust
Always taste your food. This is how you take a recipe from good to great. Does it need a little more salt to make the flavors pop? A bit more lemon juice for brightness? This is your hummus, so adjust it to your exact preference.
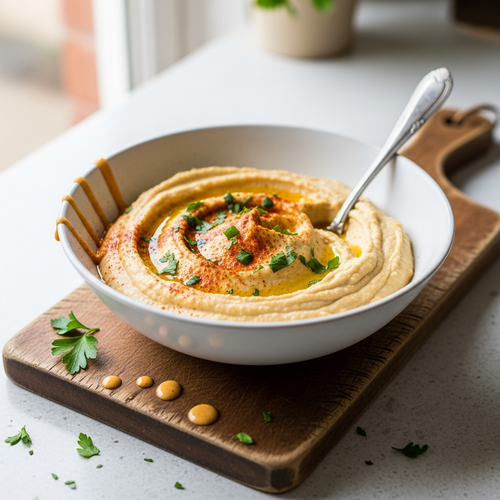
Step 6: Garnish and Serve
Transfer the hummus to a serving bowl. Use the back of a spoon to create a nice swirl on top. Garnish with an extra sprinkle of smoked paprika and some fresh chopped parsley if you’re feeling fancy. It makes it feel more like a real meal and less like “diet food.”
Step 7: Store Properly
If you have any leftovers, store them in an airtight container in the refrigerator. The flavors will continue to meld and it will be even more delicious tomorrow.
How To Serve Hummus (ADHD-Friendly)
Having healthy food prepared is only half the battle. If it’s not easy to access and eat, the ADHD brain will often default to whatever is quickest, which is usually not the healthiest option. The key is to reduce friction and make the healthy choice the easy choice. This hummus is a perfect tool for that.
My favorite strategy is what I call “Snack Platter Prep.” When you make the hummus, take an extra ten minutes to prep your dippers for the next few days. Wash and chop a variety of vegetables and put them in a clear, airtight container right at the front of your fridge. When hunger strikes and decision fatigue is high, you can just grab both containers and have a complete, satisfying snack in seconds.
This simple act of pre-planning completely removes the in-the-moment debate about what to eat. Here are some of my favorite ways to serve this hummus:
- The Classic Veggie Dip: Pair it with crunchy, high-water-content vegetables like cucumber slices, bell pepper strips, celery sticks, carrot sticks, or cherry tomatoes. It’s a high-volume, low-calorie way to feel full.
- A Better Sandwich Spread: Ditch the mayonnaise. Use a generous smear of this hummus on a whole-wheat wrap or sandwich. It adds a huge boost of protein, fiber, and flavor to your lunch. My favorite is with sliced turkey, spinach, and tomato.
- The Protein Bowl Topper: A big dollop of hummus on top of a grain bowl is a game-changer. Think grilled chicken or chickpeas, quinoa, roasted broccoli, and a scoop of this hummus on top. It acts as a creamy, delicious sauce that ties everything together.
- Smarter Cracker Companion: If you’re craving that crunch, pair the hummus with high-fiber crackers. Look for brands like Wasa, Ryvita, or Flackers. To avoid mindless overeating, portion out a serving of crackers into a small bag or bowl instead of eating straight from the box.
The goal is to create simple, repeatable systems that support your health goals without demanding a ton of executive function. This hummus, paired with pre-prepped dippers, is one of the most effective systems I’ve found.
How To Store, Reheat, and Reuse Hummus
One of the best things about this hummus is that it’s a “make once, eat multiple times” recipe, which is perfect for busy lives. Proper storage is key to making sure it stays fresh and delicious all week long. Since hummus is served cold, you don’t have to worry about reheating at all.
For storage, an airtight container is non-negotiable. It prevents the top layer from drying out and forming a skin, and it also stops the hummus from absorbing any stray odors from your refrigerator. I recommend glass containers because they don’t stain or hold smells. The hummus will stay fresh for up to 5 days in the fridge.
Here’s a crucial ADHD tip that has saved me from food waste countless times. Label the container. Grab a piece of masking tape or a dry-erase marker and write “Hummus” and the date you made it. This eliminates the mental guesswork of “What is this and is it still good?” every time you open the fridge, preventing that familiar avoidance spiral.
Beyond just using it as a dip, here are a few ways to reuse your leftover hummus throughout the week:
- Creamy Salad Dressing: Take a few tablespoons of hummus and whisk it with a little extra lemon juice and a splash of water until it reaches a pourable consistency. It makes a fantastic, high-protein dressing for a big green salad.
- Instant Pasta Sauce: This might sound unusual, but it’s a lifesaver on a busy night. Toss a generous scoop of hummus with hot, freshly cooked whole-wheat pasta. The heat from the pasta will warm the hummus and turn it into a creamy, savory sauce. Add some leftover roasted vegetables or grilled chicken for a complete meal in minutes.
- Healthier Deviled Eggs: For another high-protein snack, mix leftover hummus with the mashed yolks of hard-boiled eggs instead of mayonnaise. It provides a creamy texture and a great savory flavor for a healthier take on deviled eggs.
Thinking about leftovers as “ingredients” for future meals instead of just “leftovers” is a powerful mindset shift that helps reduce waste and makes healthy eating more convenient.
Easy Swaps & Variations for Hummus
Remember, recipes are templates, not strict rules. One of our core principles is that flexible eating always wins. The best plan is the one you can adapt to what you have on hand and what you’re in the mood for. This hummus recipe is incredibly forgiving and easy to customize.
Don’t be afraid to experiment. The goal is to create a version that you love and will want to eat consistently. Consistency is what drives results, and you’re more likely to be consistent if you genuinely enjoy your food. Think of this base recipe as your starting point for all kinds of delicious, protein-packed dips.
Here are a few simple swaps and variations to get you started:
- Go Beyond Chickpeas: While classic hummus uses chickpeas, you can get great results with other beans. Canned cannellini beans will give you an even creamier, milder-tasting dip. For a Southwestern twist, try using black beans and swap the lemon juice for lime juice.
- Make It Spicy: If you like a little heat, add a quarter teaspoon of cayenne pepper or a pinch of red pepper flakes to the food processor. For a fresher heat, you could even add a seeded jalapeño.
- Roasted Red Pepper Hummus: This is my favorite store-bought shortcut. Add about a half cup of drained, jarred roasted red peppers to the mix. It adds a sweet, smoky flavor and a beautiful color with zero extra effort.
- No Tahini on Hand: If you ran out of tahini or simply don’t care for the taste, you can leave it out. To replace some of the richness, you could add a tablespoon of smooth almond butter or just let the Greek yogurt and olive oil carry the flavor.
- Make It Dairy-Free or Vegan: To make this recipe vegan, simply swap the non-fat Greek yogurt for a plain, unsweetened dairy-free yogurt. A thick almond or soy-based yogurt would work best. Note that this will likely lower the overall protein content, so check the labels.
These small changes can keep your snacks interesting without requiring you to learn a whole new recipe. This helps prevent boredom and makes it easier to stick with your eating plan long-term.
High-Protein Greek Yogurt Hummus
Description: An incredibly creamy, high-protein hummus recipe designed for fat loss and a busy lifestyle. It uses Greek yogurt to boost protein and create a satisfying snack that crushes cravings.
Prep Time: 5 minutes | Cook Time: 5 minutes
Servings: 6
Macros per Serving | Calories: 105 | Protein: 5g | Fat: 6g | Carbohydrates: 9g
Ingredients
- 1 (15-ounce) can chickpeas, no salt added
- 1/2 cup plain non-fat Greek yogurt
- 2 tablespoons tahini
- 2 tablespoons fresh lemon juice
- 1 tablespoon extra virgin olive oil
- 1-2 cloves garlic, minced
- 1/2 teaspoon ground cumin
- 1/4 teaspoon smoked paprika, plus more for garnish
- 1/4 teaspoon salt, or to taste
- 2-4 tablespoons aquafaba (liquid from the can of chickpeas) or water
- Optional garnish: fresh parsley, chopped
Instructions
- Drain chickpeas, making sure to reserve the liquid (aquafaba). Rinse chickpeas under cold water.
- In a food processor or high-speed blender, combine the chickpeas, Greek yogurt, tahini, lemon juice, olive oil, garlic, and spices.
- Blend on high for 1 minute until a thick paste forms. Scrape down the sides of the bowl.
- With the blender running, slowly stream in 2 tablespoons of aquafaba. Continue blending for 2-4 minutes until exceptionally smooth. Add more aquafaba if needed to reach your desired consistency.
- Taste and adjust seasoning with more salt or lemon juice if desired.
- Serve immediately or store in an airtight container in the refrigerator for up to 5 days.
Notes
For the smoothest possible hummus, let the food processor run for the full 4 minutes. The extra time whips air into the mixture, making it incredibly light and creamy.
FAQs About Hummus For Weight Loss
Here are some straightforward answers to the most common questions I receive about this hummus recipe.
Is hummus actually good for weight loss?
Yes, hummus can be a fantastic food for weight loss, but the details matter. Many store-bought versions are surprisingly high in calories because they use a lot of oil and tahini. While these are healthy fats, they are very calorie-dense, and it’s easy to over-consume them. The real power of hummus for weight loss comes down to its ingredients and how you eat it.
This specific recipe is designed to be better for weight loss because we strategically swap out a large portion of the oil for protein-rich Greek yogurt. This lowers the overall calorie count while increasing the protein, which is critical for satiety. The fiber from the chickpeas also plays a huge role in keeping you full and managing blood sugar. The key is to pair your hummus with low-calorie, high-volume dippers like fresh vegetables instead of a whole bag of pita chips. Used this way, hummus is an excellent tool for hitting your goals.
Can I make this hummus without a food processor?
You definitely can, but you’ll get the best results with a machine. A high-speed blender, like a Vitamix or Ninja, is the best alternative to a food processor and will produce an equally creamy result. If you only have a standard, regular-power blender, it’s still possible, but it will require a bit more patience.
You may need to add a little extra aquafaba or water to help the blades catch and blend the thick mixture. You will also need to stop frequently to scrape down the sides and push the ingredients toward the bottom. The final texture might be a little less silky smooth, but the flavor will be just as delicious. Remember one of our core principles: we prefer brutally practical systems over perfection. A slightly rustic hummus is infinitely better than no healthy snack at all.
Why is my homemade hummus grainy?
Grainy hummus is a common frustration, and it usually comes down to one of two things: your equipment or the chickpea skins. First, if your food processor or blender isn’t very powerful, it may struggle to break down the chickpeas completely. The best solution for this is simply to let it run longer. Blending for a full 3 to 4 minutes can make a world of difference in the final texture.
The second, and more infamous, culprit is the thin skin on each chickpea. For the absolute smoothest, most velvety hummus possible, you can remove these skins before blending. To do this, you can gently pinch each chickpea and the skin will slip right off. However, let me be direct. As someone with ADHD, I find this task incredibly tedious and I almost never do it. The beauty of this recipe is that the creaminess from the Greek yogurt and a long blending time gets you 95% of the way there with 1% of the effort. Don’t let the pursuit of perfect hummus prevent you from making good hummus.
How can I make this hummus recipe even higher in protein?
This recipe is already optimized to have a great balance of protein, flavor, and texture, but if you’re looking to maximize the protein content even further, you have a couple of good options. The easiest way is to choose your Greek yogurt strategically. Different brands have different protein levels, so check the labels. Some brands like Oikos Pro or Fage can have a few extra grams of protein per serving.
Another excellent and nearly undetectable method is to add a scoop of unflavored collagen peptides or a plant-based protein powder. Add it to the food processor along with all the other ingredients. Collagen dissolves completely and has no taste, so it won’t affect the final product at all. It’s a simple way to add an extra 10-20 grams of protein to the entire batch, boosting the protein content of each serving.
Does eating hummus cause bloating or gas?
For some people, chickpeas and other legumes can cause some digestive discomfort like bloating or gas. This is because they contain fiber and certain types of carbohydrates called oligosaccharides that our bodies can’t fully break down. The bacteria in our gut then ferment these carbs, which can produce gas.
There are a few things you can do to minimize this. First, rinsing the canned chickpeas very well before using them can help wash away some of these compounds. Second, if you are new to eating a lot of fiber, start with a smaller portion size and see how your body reacts. Your digestive system will often adapt over time. Finally, make sure you are drinking plenty of water throughout the day, as this helps your body process the increased fiber intake more effectively.
Try These High-Protein Recipes Next
If you enjoyed this simple and effective recipe, here are a few more high-protein favorites from our collection that fit the same philosophy.
- Healthy Buffalo Chicken Dip – This is the ultimate guilt-free party dip, packed with protein and that classic spicy flavor you love.
- High-Protein Egg Salad – My go-to recipe for a quick and incredibly filling lunch that replaces all the mayo with Greek yogurt.
- Over 40 Homemade Hummus Recipes – For when you’ve mastered this base recipe and want to explore a world of new flavors, this roundup is an amazing resource for creative ideas.
Each of these recipes is designed to be simple, delicious, and supportive of your fitness goals.