For most of my life, tiramisu was a “special occasion” dessert. It was something you ordered at a nice Italian restaurant, a symbol of indulgence that felt completely off-limits once I started my fat loss journey. The rich mascarpone, the sugar-soaked ladyfingers, the sheer decadence of it all seemed like the exact opposite of what I should be eating.
When I lost 65-70 pounds, I did it by finding ways to include foods I loved, not by cutting them out. But tiramisu felt like a final boss I couldn’t beat. It was just too high in fat and sugar. I tried to forget about it, but the craving would always sneak back in.
That’s where my ADHD brain’s obsession for problem-solving kicked in. I thought, what if I could build a tiramisu from the ground up with fat loss macros in mind? What if it could be high in protein, low in sugar, and still taste like the real thing? This recipe is the result of that obsession. It’s a brutally practical way to enjoy one of the world’s best desserts without the guilt or the sugar crash.
It’s proof that you don’t have to give up your favorites. You just have to work with your brain, not against it.
Skip to My Flexibe Diet Recipe!
Why Tiramisu Is Great For Fat Loss
Let’s be direct. The words “tiramisu” and “fat loss” don’t usually belong in the same sentence. A single slice from a restaurant can pack over 500 calories, loaded with fat and sugar that will spike your blood sugar and leave you craving more just an hour later. That kind of food makes consistency nearly impossible.
This recipe flips the script entirely. We’re rebuilding this classic dessert on a foundation of our core principles: protein first, hunger management second.
The magic starts with the cream filling. Instead of using heaps of full-fat mascarpone and sugar-laden egg yolks, our base is non-fat Greek yogurt. This one swap dramatically cuts down on fat and calories while adding a huge dose of protein. We then add vanilla whey protein powder, which further boosts the protein content. This isn’t just for macros; it makes each serving incredibly satisfying and helps crush cravings for hours.
More protein means you feel fuller, longer. When you eat a slice of this tiramisu, you’re not just satisfying a sweet tooth. You are actively managing your hunger, which is the single biggest battle in any fat loss journey. We also use a powdered sweetener instead of sugar, which gives you all the sweetness without the calories or the energy crash.
This is what flexible eating looks like. It’s not about restrictive “cheat meals” that lead to a spiral. It’s about intelligently designing foods you love to fit your goals. You can have a delicious, satisfying dessert that actively supports your fat loss, making the entire process more sustainable and enjoyable.
Ingredients You’ll Need for Tiramisu
The ingredients for this high-protein tiramisu are simple and chosen for a specific purpose: to maximize flavor and macros without overcomplicating things. We’re not using a dozen obscure items. Everything here should be easy to find at your local grocery store.
The star players are the non-fat Greek yogurt and light mascarpone, which create that classic creamy texture without the massive fat content of the original. The protein powder is our secret weapon for satiety.
- For the Protein Cream:
- 2 cups (480g) plain non-fat Greek yogurt
- 1/2 cup (113g) light mascarpone cheese
- 3 large egg yolks
- 4 large egg whites
- 1/2 cup (60g) vanilla or unflavored whey protein powder
- 1/2 cup powdered erythritol or monk fruit sweetener (or to taste)
- 1 teaspoon vanilla extract
- Pinch of salt
- For Assembly:
- 1 ½ cups (360ml) strong brewed coffee or espresso, chilled
- 1 tablespoon coffee liqueur or dark rum (optional)
- 7 oz (200g) package of ladyfingers
- 2 tablespoons unsweetened cocoa powder, for dusting
A few notes on these ingredients. For the Greek yogurt, make sure it’s plain and non-fat. A thick yogurt like Fage or Chobani works best to get a firm, creamy texture. For the protein powder, a whey isolate will mix in the smoothest. If you only have concentrate, you might need to whisk a little longer to eliminate lumps. Vanilla flavor is great, but unflavored works perfectly too.
Finally, you must use a powdered sweetener like erythritol or monk fruit. Granular sweeteners will not dissolve properly in the cold cream mixture, leaving you with a gritty texture. This is a non-negotiable step for getting that silky-smooth finish we all love in a tiramisu.
How To Make Tiramisu (Step-By-Step)
Making this tiramisu is mostly an assembly job, which is perfect for low-motivation days. There’s no baking involved. The key is to follow the steps in order to get the light, airy texture right. Let’s break it down.
Step 1: Create the Protein Cream Base
In a large bowl, you’ll combine the Greek yogurt, light mascarpone, egg yolks, vanilla protein powder, powdered sweetener, vanilla extract, and salt. Whisk everything together until it’s perfectly smooth. Don’t rush this part. Any lumps of protein powder left now will be in the final dessert, so scrape the sides and bottom of the bowl to make sure it’s all incorporated.
Step 2: Beat the Egg Whites
In a separate, completely clean bowl, use an electric mixer to beat the egg whites. You’re looking for stiff peaks. This means when you lift the beaters out of the whites, the peak that forms holds its shape and doesn’t flop over. An ADHD tip: set a timer for 3-4 minutes so you don’t get distracted and overbeat them, which can cause them to break down.
Step 3: Fold the Mixtures Together
This is the most important technique for a light tiramisu. Gently fold about one-third of your stiff egg whites into the yogurt mixture. This lightens the dense base. Then, add the rest of the whites and carefully fold them in until just combined. Use a spatula to go down the middle, scrape along the bottom, and “fold” the batter over. Do not stir or whisk, or you will deflate all the air you just whipped in.
Step 4: Prepare the Coffee Dip
In a shallow dish (a pie plate or square baking dish works well), combine your chilled coffee and the optional liqueur or rum. Make sure the coffee is completely cool, otherwise it will turn your ladyfingers into mush instantly.
Step 5: Dip and Layer the Ladyfingers
This is a rapid-fire process. Dip one ladyfinger at a time into the coffee for just 1-2 seconds per side. That’s it. Any longer and they will fall apart. Arrange the dipped ladyfingers in a single layer in your 8×8 inch dish. You might need to break a few to fit them into the gaps.
Step 6: Assemble the Layers
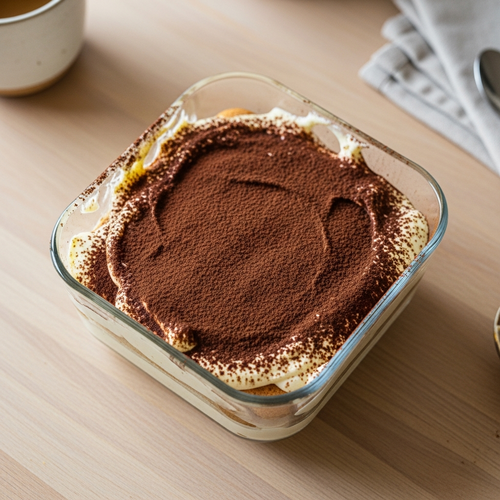
Spread half of the protein cream mixture over the first layer of ladyfingers. Use an offset spatula or the back of a spoon to get it even. Then, dust this layer with half of the cocoa powder. Repeat the process: add another layer of coffee-dipped ladyfingers, the rest of the cream, and a final, generous dusting of cocoa powder. The dessert is now assembled.
Step 7: Chill and Set
Cover the dish with plastic wrap and put it in the refrigerator for at least 6 hours. Honestly, overnight is even better. This time is crucial. It allows the ladyfingers to soften perfectly and all the flavors to meld together into a true tiramisu. This is a great “set it and forget it” step that requires zero effort.
How To Serve Tiramisu (ADHD-Friendly)
How you serve this tiramisu is just as important as how you make it, especially when you’re working with an ADHD brain and trying to stick to a fat loss plan. The goal is to make it easy to enjoy a single, satisfying portion without the temptation to eat the entire pan.
My number one tip is to pre-portion it. Once the tiramisu has fully set in the fridge, take it out and cut it into your desired number of servings. I usually do 8 or 9 squares. Then, use a spatula to place each individual serving into its own small food container. This strategy is a game-changer for a few reasons.
It tackles the “out of sight, out of mind” issue. When you open the fridge, you see a single, ready-to-eat dessert, not an entire tray that whispers “just one more sliver.” This massively reduces decision fatigue and the risk of mindless overeating. Here are a few more tips for serving:
- Label Your Portions: If you’re tracking macros, take two minutes to label each container with the calories or protein content. This way, you can grab it and log it without having to do math later when your motivation is low.
- Plan Your Treat: Don’t leave it to chance. Plan to have your slice of tiramisu at a specific time, like after dinner. This helps prevent impulsive snacking and turns it into a structured, rewarding part of your day.
- Keep It Simple: This dessert is incredible on its own. You don’t need to add whipped cream, syrups, or anything else. Serve it as is, maybe with a cup of decaf coffee or tea. Less fuss, fewer extra calories, and just as delicious.
By setting up these simple systems, you turn this recipe from a potential pitfall into a powerful tool for sustainable fat loss. You get to enjoy an amazing dessert while staying in complete control.
How To Store, Reheat, and Reuse Tiramisu
Proper storage is key to making this tiramisu last, allowing you to enjoy your pre-portioned treats throughout the week. Since this is a no-bake, refrigerated dessert, the rules are pretty simple, which is exactly what we need.
First off, there is no reheating involved. Ever. This is a chilled dessert, and heating it would melt the cream and turn it into a soupy mess. It’s meant to be eaten cold, straight from the refrigerator.
For storage, you have two main options: the fridge or the freezer. Here’s how to handle both to maintain the best quality:
- In the Refrigerator: Your tiramisu will stay fresh and delicious in the fridge for up to 4 days. Whether you store it in the original dish or in individual portions, make sure it is covered tightly. Use plastic wrap or a well-fitting lid to prevent it from drying out or absorbing any other fridge odors.
- In the Freezer: Yes, you can freeze this tiramisu. It’s a great option if you want to make a batch and save it for later. For best results, freeze it in individual, airtight containers. It will keep well for up to a month. When you’re ready to eat it, simply move a portion from the freezer to the fridge and let it thaw for several hours or overnight. The texture of the cream might be slightly less airy after freezing, but the flavor will still be fantastic.
Because this recipe is designed for single servings, there aren’t many ways to “reuse” leftovers in the traditional sense. The best way to reuse it is to simply eat it as intended. You made a delicious, macro-friendly dessert. Enjoy it without feeling like you need to transform it into something else.
Easy Swaps & Variations for Tiramisu
One of the best things about this recipe is its flexibility. Life happens. Sometimes you don’t have the exact ingredient, or you need to make a swap based on dietary needs or what’s on sale. This tiramisu recipe is very forgiving. Here are some simple, practical swaps you can make without wrecking the final product.
Remember our core principle: consistency over perfection. It’s better to make a slightly modified version that fits your life than to not make it at all because you’re missing one item. These variations are designed to keep you on track.
Here are a few easy swaps that work well:
- For a Creamier Texture: If you’re not as concerned about the fat content and want a richer dessert, you can swap the light mascarpone for full-fat mascarpone. You could also use 2% or 5% fat Greek yogurt instead of non-fat. The macros will change, but the flavor will be even more decadent.
- Different Protein Flavors: While vanilla is classic, this tiramisu is amazing with other protein powder flavors. Chocolate, salted caramel, or even a coffee-flavored whey protein would all be incredible and add a unique twist.
- Make It Gluten-Free: To make this recipe gluten-free, simply purchase gluten-free ladyfingers. They are available in the specialty aisle of most larger grocery stores and online. The assembly process is exactly the same.
- Go Alcohol-Free: The coffee liqueur or rum is completely optional. If you prefer to leave it out, you can. For a hint of that flavor without the alcohol, add a quarter teaspoon of rum extract to your coffee mixture.
- Mascarpone Substitute: If you can’t find light mascarpone, you can substitute it with light or neufchâtel cream cheese. The flavor will be slightly tangier, more like a cheesecake, but it will still be delicious. You could also just use more Greek yogurt, but the cream will be less firm.
These small adjustments allow you to make the recipe your own while keeping it aligned with your fitness goals. Don’t be afraid to experiment and find what works best for you.
High-Protein Tiramisu Recipe
Description: A guilt-free, high-protein take on the classic Italian dessert. This tiramisu is light, creamy, and packed with flavor, designed to crush cravings and support your fat loss goals without compromising on taste.
Prep Time: 20 minutes | Chill Time: 6 hours
Servings: 8 servings
Macros per Serving | Calories: 245 | Protein: 21g | Fat: 9g | Carbohydrates: 20g
Ingredients
- 2 cups (480g) plain non-fat Greek yogurt
- 1/2 cup (113g) light mascarpone cheese
- 3 large egg yolks
- 4 large egg whites
- 1/2 cup (60g) vanilla or unflavored whey protein powder
- 1/2 cup powdered erythritol or monk fruit sweetener
- 1 teaspoon vanilla extract
- 1 ½ cups (360ml) strong brewed coffee or espresso, chilled
- 1 tablespoon coffee liqueur (optional)
- 7 oz (200g) package of ladyfingers
- 2 tablespoons unsweetened cocoa powder
Instructions
- In a large bowl, whisk together Greek yogurt, mascarpone, egg yolks, protein powder, sweetener, and vanilla until completely smooth.
- In a separate clean bowl, beat egg whites with an electric mixer until stiff peaks form.
- Gently fold the beaten egg whites into the yogurt mixture in two parts until just combined. Do not overmix.
- Combine chilled coffee and optional liqueur in a shallow dish.
- Quickly dip each ladyfinger in the coffee (1-2 seconds per side) and arrange a single layer in an 8×8 inch dish.
- Spread half of the protein cream over the ladyfingers and dust with half the cocoa powder.
- Repeat with another layer of dipped ladyfingers, the remaining cream, and a final dusting of cocoa powder.
- Cover and refrigerate for at least 6 hours or overnight before serving.
Notes
Using pasteurized eggs is recommended to eliminate any risk associated with consuming raw eggs. Ensure your coffee is fully chilled to prevent the ladyfingers from becoming soggy.
FAQs About Tiramisu For Weight Loss
Here are some straightforward answers to the most common questions I receive about this tiramisu recipe.
Can you really eat tiramisu and lose weight?
Absolutely, but it has to be the right kind of tiramisu. A traditional restaurant slice will likely set you back on your goals because it’s engineered with high amounts of fat and sugar, ingredients that drive cravings and don’t provide much satiety. This makes it very easy to overeat, not just on the dessert itself, but on other foods later.
This recipe is fundamentally different. It’s built on a foundation of protein from Greek yogurt and whey powder. Protein is the most satiating macronutrient, meaning it helps you feel full and satisfied on fewer calories. By eating this tiramisu, you are managing hunger, not creating it. It fits perfectly into a flexible dieting approach where no foods are “off-limits,” but are instead modified to fit your daily calorie and macro targets. It allows you to satisfy a craving in a controlled, beneficial way.
Why is this high-protein tiramisu recipe better than traditional tiramisu for fat loss?
The difference comes down to the ingredients and their impact on your body. Traditional tiramisu gets its creamy texture from massive amounts of full-fat mascarpone cheese and a custard made from egg yolks and sugar. While delicious, this combination is a caloric bomb with very little protein.
Our version strategically swaps these ingredients. We replace the bulk of the mascarpone with non-fat Greek yogurt, which slashes the fat content and adds significant protein. We boost this further with whey protein powder. We also replace all the refined sugar with a zero-calorie powdered sweetener. The result is a dessert that is much lower in calories and fat, significantly higher in protein, and has a minimal impact on your blood sugar. This macronutrient profile makes it an asset for fat loss, not a liability.
My tiramisu came out watery. What did I do wrong?
A watery tiramisu is a common problem, and it almost always comes down to one of three things. First, and most likely, you over-soaked the ladyfingers. They are like little sponges and only need a very quick dip in the coffee, literally one to two seconds per side. If they absorb too much liquid, they will release it into the cream, creating a soggy, watery base.
Second, the thickness of your Greek yogurt matters. If you used a thinner, runnier brand of yogurt, your cream base will be less stable. Always opt for a very thick Greek yogurt. Third, you may have deflated the egg whites while folding them in. The air whipped into the egg whites provides structure. If you stir or mix too aggressively instead of gently folding, that air escapes, and the cream will be much looser. Be patient during that step to keep the mixture light and airy.
Can I make this tiramisu without protein powder?
You can, but it will change the recipe significantly. The protein powder serves two main functions here. First, it adds a substantial amount of protein, which is the primary reason this dessert is so effective for hunger management and fitting into a fat loss plan. Without it, you’re losing the main nutritional benefit.
Second, the protein powder also acts as a thickener, helping the cream mixture set firmly. If you omit it, your cream will be much softer and may not set as well. If you must leave it out, I recommend using an even thicker Greek yogurt (like Fage Total 0%) and be prepared for a dessert with a much lower protein count and a softer consistency.
Is it safe to use raw eggs in this tiramisu recipe?
This is a very important question. Traditional tiramisu, and this version, uses raw egg yolks and whites to achieve its signature texture. While the risk of salmonella from fresh, properly handled eggs is low for healthy individuals, it is not zero. Certain groups, including pregnant women, young children, the elderly, and those with compromised immune systems, should avoid consuming raw eggs.
To completely eliminate the risk, I strongly recommend using pasteurized eggs. You can find pasteurized shell eggs or liquid egg whites and yolks in most supermarkets. They have been gently heated to kill any harmful bacteria, making them perfectly safe to consume raw. The recipe will work exactly the same with pasteurized eggs, giving you total peace of mind without sacrificing any of the authentic texture or flavor.
Try These High-Protein Recipes Next
If you enjoyed this easy, macro-friendly tiramisu, you’ll love some of my other dessert recipes designed for a fit lifestyle.
- High-Protein Cheesecake: A rich, creamy cheesecake that’s secretly packed with protein and incredibly easy to make.
- The Best Protein Banana Pudding: My take on the Southern classic, with all the comforting flavor but with macros that work for you, not against you.
- 25 No Bake Desserts: A great roundup of other simple, no-bake ideas perfect for when you need a quick and easy treat without turning on the oven.
These recipes prove that you can always find a way to enjoy the foods you love while building a body you’re proud of.