I have a long history with Rice Krispie treats. As a kid, they were the ultimate comfort food. That classic blue box, the giant bag of marshmallows, the slab of butter melting in a pot. It was pure magic. When I started my fitness journey and lost over 65 pounds, I thought those days were gone forever. I figured treats like that were off-limits if I wanted to see real results.
For a long time, I followed the restrictive, all-or-nothing mindset that many of us with ADHD fall into. You’re either “on a diet” or “off a diet.” There’s no middle ground. This approach always led to burnout and eventually giving up entirely. It wasn’t until I embraced flexible eating that everything changed. I realized I didn’t have to cut out my favorite foods; I just needed to rebuild them to fit my goals.
That’s what motivated me to develop these high-protein rice krispie treats. I wanted that same chewy, sweet, satisfying snack, but I wanted it to work for me, not against me. I needed a version that would crush my sweet cravings, pack a serious protein punch to keep me full, and be simple enough to make on a low-energy day. This recipe is the result of that mission. It’s a cornerstone of my sustainable lifestyle, and it proves that you can absolutely build the body you want without giving up the foods you love.
Skip to My Flexibe Diet Recipe!
Why Rice Krispie Treats Are Great For Fat Loss
Let’s be direct. When you hear “Rice Krispie treats” and “fat loss” in the same sentence, it can sound like a contradiction. We’ve been conditioned to think of treats as “cheats” or rewards that derail our progress. But with the ADHD FIT approach, we reframe these foods as tools. This recipe isn’t a cheat. It’s a strategic way to manage hunger, satisfy cravings, and stay consistent, which is the real secret to long-term success.
The magic is in the macros. We’ve fundamentally changed the nutritional profile of the classic treat. By adding a full cup of protein powder, we’re turning a sugar-and-carb bomb into a balanced snack. Protein is the number one priority for fat loss because it’s incredibly satiating. It keeps you feeling full for hours, which drastically reduces the chances of mindless snacking or overeating later.
These treats also help us work with our ADHD brains, not against them. The all-or-nothing thinking pattern is a huge obstacle. We think we have to eat perfectly, and the moment we have one “bad” thing, the whole day is a write-off. Including planned, enjoyable, macro-friendly foods like these protein rice krispie treats breaks that cycle. It gives your brain the dopamine hit it craves from a sweet treat without the subsequent sugar crash and guilt spiral. It’s a sustainable way to enjoy your food while consistently moving toward your goals.
Ingredients You’ll Need for Rice Krispie Treats
I’m all about simplicity and using ingredients that deliver maximum results with minimum fuss. Each component in this recipe is chosen for a specific reason, working together to create a treat that’s both delicious and supportive of your fitness goals. The real star of the show here is the protein powder, which transforms the entire nutritional landscape of this classic snack.
Here’s the full list of what you will need:
- 4 cups protein-fortified crispy rice cereal
- 1 cup vanilla or unflavored whey-casein blend protein powder
- 1/2 cup sugar-free maple syrup
- 1/4 cup almond butter
- 2 tablespoons light butter or coconut oil
- 1 teaspoon vanilla extract
- Pinch of salt
- 4 cups mini marshmallows or sugar-free marshmallows
Let’s talk about the key ingredient: the whey-casein blend protein powder. This is not the place to skimp. I strongly recommend a blend over 100% whey. Whey digests quickly, while casein digests slowly. The blend gives you the best of both worlds, promoting satiety for longer. More importantly, it creates a much better texture. Using only whey can sometimes result in a dry or gritty final product. A good quality blend mixes smoothly and keeps the treats chewy.
For the cereal, using a protein-fortified version like Special K Protein or a generic equivalent adds an extra layer of protein. However, regular crispy rice cereal works just fine if that’s what you have. The sugar-free maple syrup provides sweetness and acts as a binder without adding empty calories, and a creamy almond butter adds healthy fats and more flavor depth. These smart choices make all the difference.
How To Make Rice Krispie Treats (Step-By-Step)
One of my core rules is that a recipe has to be doable on a low-motivation day. This one absolutely is. It requires no baking and comes together in about 15 minutes. The key is to have your ingredients measured and ready to go before you start, a practice called “mise en place.” For the ADHD brain, this simple prep step can prevent you from feeling overwhelmed mid-process.
Step 1: Prepare Your Pan and Dry Ingredients
First things first, get your 9×9 inch baking pan ready. You can grease it with non-stick spray, but I highly recommend lining it with parchment paper. Leave a little extra paper hanging over the sides to use as “handles.” This makes lifting the whole block of treats out for easy cutting an absolute breeze. It’s a small step that eliminates the frustration of trying to pry the first square out. In a large bowl, mix your protein-fortified crispy rice cereal and the protein powder. Whisk them together until the powder is evenly distributed. You don’t want any clumps of protein.
Step 2: Melt the Binders
In a medium saucepan, combine the sugar-free maple syrup, almond butter, and light butter or coconut oil. The most important tip here is to use low heat. If the heat is too high, the sugars in the syrup can burn, and the butter can separate, giving your treats a weird taste and texture. Stir it continuously with a spatula until everything is melted and you have a smooth, cohesive liquid. This usually takes just a few minutes.
Step 3: Add Flavor and Marshmallows
Once your liquid mixture is smooth, remove the pan from the heat completely. Now, stir in the vanilla extract and a pinch of salt. The salt is not optional. It balances the sweetness and makes all the other flavors pop. Next, add your mini marshmallows. Stir them into the warm liquid until they are about 75% melted. You want some small, gooey chunks of marshmallow to remain. This creates amazing pockets of texture in the finished treats.
Step 4: Combine and Press
Now, work quickly. Pour the warm marshmallow mixture over your cereal and protein powder. Use a spatula to fold everything together until all the dry ingredients are coated. Finally, transfer the sticky mixture into your prepared pan. Here’s the second most important tip: do not pack it down firmly. Use the back of your spatula, lightly greased, or a piece of parchment paper to gently press the mixture evenly into the pan. Pressing too hard is what creates dense, hard treats. We want light and chewy.
Step 5: Cool and Cut
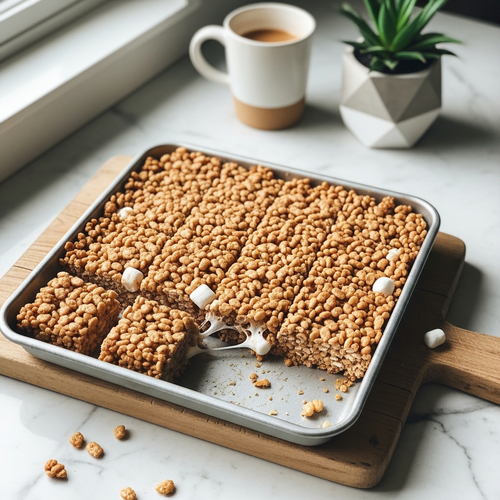
Patience is key for this last step. Let the treats cool at room temperature for at least 30 minutes, or an hour to be safe. This allows them to set up properly. If you’re in a hurry, you can pop the pan in the fridge for about 15-20 minutes, but don’t leave it longer, or they can get too hard. Once set, use the parchment paper handles to lift the block onto a cutting board, and slice into your desired number of squares.
How To Serve Rice Krispie Treats (ADHD-Friendly)
How you serve and integrate these treats into your life is just as important as how you make them. For those of us with ADHD, having a plan is crucial to prevent impulsive decisions and stay on track. These rice krispie treats are fantastic tools, but without a system, any food can be overeaten. The goal is to make them an easy, pre-planned part of your day.
My number one tip is to pre-portion immediately. As soon as they are cooled and cut, wrap each square individually in plastic wrap or put them into small sandwich bags. Then, store them in a container. This simple act of pre-portioning removes future decision-making. When you want a snack, you don’t have to decide on the serving size. You just grab one bag. This helps prevent the “I’ll just have one more sliver” trap that can easily lead to eating half the pan.
Incorporate them into your routine in a structured way. Here are a few ideas that work well:
- As a Pre-Workout Snack: The mix of simple and complex carbs provides quick energy for your workout. Have one about 30-60 minutes before hitting the gym.
- For Post-Workout Recovery: The protein and quick-digesting carbs are perfect for replenishing glycogen stores and helping with muscle repair after a workout.
- A Planned Afternoon Treat: Do you get a sweet craving around 3 p.m.? Instead of fighting it and ending up at the vending machine, plan to have one of these treats with a cup of coffee or tea. It satisfies the craving and gives you a protein boost to power through the rest of your day.
By giving these treats a specific job in your day, you take away the guilt and turn them into a functional part of your nutrition plan. It’s about being intentional, which is a powerful strategy for managing both ADHD and a fitness lifestyle.
How To Store, Reheat, and Reuse Rice Krispie Treats
Proper storage is key to making sure your delicious, high-protein rice krispie treats stay fresh and chewy. The last thing you want is to reach for a snack only to find it’s become hard as a rock. Luckily, storing them is incredibly simple and requires no special equipment. Following the ADHD-friendly tip of pre-portioning them first will also make storage much easier.
Once your treats are cut and individually wrapped, the best way to store them is in an airtight container at room temperature. They will stay fresh and maintain their ideal chewy texture for up to three to four days. Leaving them on the counter is perfectly fine and is my preferred method. Storing them in the refrigerator can make them quite hard and dry out the marshmallows. If you live in a very hot or humid climate, the fridge might be necessary to prevent them from becoming too gooey, but be aware of the texture change.
Here are your main storage options:
- Room Temperature: For maximum chewiness, store in an airtight container on your counter for up to 4 days. This is the best method for preserving texture.
- Refrigeration: If you must, you can store them in an airtight container in the fridge for up to a week. They will be much firmer. I recommend letting them sit out for 10-15 minutes to soften before eating.
- Freezing: Yes, you can freeze them! This is a great hack for long-term storage. Wrap each square tightly in plastic wrap, then place them in a freezer-safe Ziploc bag. They can be frozen for up to a month. To thaw, just leave one on the counter for about 20-30 minutes.
These treats don’t require reheating. They are designed to be eaten at room temperature. If you’ve stored them in the fridge and find them too hard, simply letting them sit on the counter is the best way to soften them up. Microwaving them will melt the marshmallows and can create a sticky, messy situation. A little planning with storage ensures you have a perfect, convenient snack ready to go whenever you need it.
Easy Swaps & Variations for Rice Krispie Treats
One of the best things about this recipe is its flexibility. We all have different tastes, dietary needs, and pantries. Don’t feel locked into the exact ingredients I’ve listed. As long as you maintain the right ratios of dry to wet ingredients, you can get creative and tailor these treats to your preferences. This is a perfect example of working with what you have, a key skill for staying consistent with ADHD.
The protein powder is a great place to start experimenting. While I recommend a vanilla or unflavored whey-casein blend for the best texture, you can easily use other flavors. A chocolate protein powder will create rich, chocolatey treats. A strawberry or salted caramel flavor could also be delicious. Just be mindful that flavored powders often have a stronger taste, so you might want to start with a little less and see how you like it.
Here are some other easy swaps and fun variations to try:
- Nut Butter Variations: Don’t have almond butter? Creamy peanut butter or cashew butter work perfectly as a one-to-one substitute. For a nut-free option, try using sunflower seed butter.
- Cereal Swaps: While crispy rice cereal is classic, you can substitute other cereals like Chex or even Cheerios for a different texture. Just make sure the volume is roughly the same.
- Fun Mix-Ins: After you’ve mixed everything together, you can fold in some extras. A handful of sugar-free chocolate chips, some colorful sprinkles, or a tablespoon of chia seeds for extra fiber are all great options.
- Make It Dairy-Free: To make this recipe dairy-free and vegan, use a plant-based protein powder (a pea and rice blend works well), coconut oil instead of light butter, and vegan marshmallows. The results will be just as tasty.
Don’t be afraid to play around with the recipe. Finding a variation you absolutely love is the key to making this a staple snack you’ll return to again and again. That’s what a sustainable lifestyle is all about.
High-Protein Rice Krispie Treats
Description: A simple, no-bake recipe for chewy, delicious Rice Krispie treats packed with protein. The perfect macro-friendly snack to crush sweet cravings and support your fat loss goals without the guilt.
Prep Time: 5 minutes | Cook Time: 10 minutes
Servings: 12 squares
Macros per Serving | Calories: 185 | Protein: 12g | Fat: 6g | Carbohydrates: 21g
Ingredients
- 4 cups protein-fortified crispy rice cereal
- 1 cup vanilla or unflavored whey-casein blend protein powder
- 1/2 cup sugar-free maple syrup
- 1/4 cup almond butter
- 2 tablespoons light butter or coconut oil
- 1 teaspoon vanilla extract
- Pinch of salt
- 4 cups mini marshmallows or sugar-free marshmallows
Instructions
- Line a 9×9 inch pan with parchment paper. In a large bowl, whisk together the cereal and protein powder.
- In a saucepan over low heat, melt the sugar-free syrup, almond butter, and light butter until smooth.
- Remove from heat and stir in the vanilla extract and salt.
- Add the mini marshmallows and stir until about 75% melted.
- Pour the wet mixture over the dry ingredients and fold until fully coated.
- Gently press the mixture into the prepared pan. Do not pack it down hard.
- Let cool for at least 30 minutes at room temperature before cutting into 12 squares.
Notes
Using a whey-casein blend protein powder provides the best texture. Storing treats in an airtight container at room temperature will keep them chewy for up to 4 days.
FAQs About Rice Krispie Treats For Weight Loss
Here are some straightforward answers to the most common questions I receive about this protein rice krispie treats recipe.
Can you make these Rice Krispie treats without protein powder?
You can, but it fundamentally changes the recipe’s purpose within a fat loss plan. The protein powder is the key ingredient that makes these a macro-friendly snack. It adds significant satiety, helping you stay full and manage hunger, which is critical when you’re in a calorie deficit. Without it, the treats will be much higher in carbohydrates and sugar (even with sugar-free syrup) and lower in protein, making them more of a traditional dessert than a strategic snack.
If you choose to omit the protein powder, you will also need to adjust the wet-to-dry ingredient ratio. The powder absorbs a lot of moisture, so if you remove it, your mixture will be much looser. You may need to reduce the amount of syrup or add more cereal to get the right consistency. Essentially, you would be making something closer to traditional Rice Krispie treats, which can still fit into a flexible diet in moderation, but they won’t provide the same hunger-blunting benefits.
Are these Rice Krispie treats actually healthy?
The word “healthy” can be subjective, so I prefer to think in terms of “goal-supportive.” Are these treats supportive of a fat loss or fitness goal? Absolutely. They are designed to provide a high amount of protein relative to their calorie count, which helps with muscle maintenance and satiety. They offer a controlled way to satisfy a sweet tooth, preventing the kind of restrictive dieting that often leads to binging. This makes them a psychologically healthy tool for long-term adherence.
Compared to their traditional counterparts, they are significantly lower in sugar and much higher in protein and fiber (depending on your cereal choice). They offer a balanced profile of protein, carbs, and fats. So, while they are still a “treat,” they are a much smarter, more functional choice that aligns with a healthy lifestyle. They fuel your body and your goals instead of just providing empty calories.
Why are my protein Rice Krispie treats so hard?
This is the most common issue people face, and it almost always comes down to one of two things: pressing the mixture into the pan too firmly or overcooking the marshmallow mixture. When you pack the sticky cereal into the pan with a lot of force, you are compressing everything and squeezing out all the air. This results in a dense, hard brick instead of a light, chewy square. The key is to be gentle. Use a spatula or a piece of parchment paper to just lightly pat the mixture into an even layer.
The other culprit is heat. If you melt your butter and marshmallow mixture over heat that is too high, or for too long, the sugar can start to caramelize and harden as it cools. Always use low heat and remove the saucepan from the stove as soon as the marshmallows are mostly melted. This keeps the binder soft and gooey, which is essential for that perfect chewy texture we all love.
What is the best protein powder for Rice Krispie treats?
For this specific recipe, a whey-casein blend is hands-down the best choice. This type of protein powder offers the best of both worlds. Whey is a fast-digesting protein, and casein is slow-digesting. This combination is great for keeping you full longer. More importantly for this recipe, the blend creates a superior texture. It mixes in smoothly without becoming gritty or dry and helps keep the treats moist and chewy.
You can use 100% whey isolate, but be aware that it can sometimes make the final product a bit drier. If you go that route, you might need to slightly increase the amount of liquid. Plant-based protein powders can also work, especially blends of pea and brown rice protein, but they have a more distinct flavor and can be a bit chalkier. If you use a plant-based powder, make sure it’s one you already enjoy the taste of.
Can I use regular marshmallows in these Rice Krispie treats?
Yes, you absolutely can use regular mini marshmallows instead of a sugar-free alternative. The recipe will work just the same in terms of texture and preparation. The main difference will be in the nutritional information. Using regular marshmallows will increase the overall sugar and carbohydrate content of each treat, and therefore the total calories as well. This isn’t necessarily a “bad” thing, but it’s something you need to be aware of so you can account for it in your daily macros.
If you’re less concerned with minimizing sugar and have the flexibility in your calorie budget, regular marshmallows are a great option and often provide a superior melt and flavor. My philosophy is all about flexible eating. If using regular marshmallows makes you enjoy these treats more and helps you stick to your plan, then it’s the right choice for you. Just remember to track the change in macros accurately.
Try These High-Protein Recipes Next
If you loved how easy and delicious these protein rice krispie treats were, here are a few other simple, high-protein recipes you should try.
- Scotcheroos Recipe: Another no-bake classic, these have a delicious peanut butter and chocolate topping.
- Rice Crispy Treats Recipe: A slightly different take on the protein treats, with a few tweaks to the classic formula.
- Caramel Macchiato Krispie Treats: For coffee lovers, this recipe adds a fantastic caramel coffee flavor to the mix.
Give these a try the next time you need a simple, satisfying, and goal-oriented snack.