For years, I put bread on the “do not eat” list. In my mind, it was the enemy of fat loss. Just empty carbs that would derail my progress and leave me feeling hungry an hour later. As a single dad with ADHD trying to lose 65 pounds, I needed food that worked for me, not against me. Simple, right? But I missed it. A lot.
Then I found sourdough. It was different. It felt more substantial, tasted better, and didn’t leave me feeling bloated. It was the first crack in my rigid “no bread” rule. I started to wonder if I could take something good and make it even better for my fitness goals.
That’s what led me to this high-protein sourdough bread recipe. I wanted to create a loaf that not only satisfied that deep-seated craving for good bread but also packed a serious protein punch to keep me full and support my workouts. This isn’t just bread. It’s a tool for a sustainable lifestyle, built for people like us who need practical solutions, not perfect restrictions.
Why This High-Protein Sourdough Bread Is Great For Fat Loss
Let’s be direct. Bread is usually considered a carb source, and not much else. But we’re changing the game with this recipe. We’re not just making bread; we’re building a macro-friendly food that actively helps you hit your fat loss goals. This is a core principle at ADHD FIT: make the foods you love work for you.
The first and most important modification is the protein boost. By adding unflavored protein powder and non-fat Greek yogurt, we’re fundamentally changing the nutritional profile. Each slice becomes a significant source of protein. Why does that matter? Protein is the king of satiety. It keeps you feeling full and satisfied for much longer than carbs alone, which is your number one weapon against mindless snacking and cravings.
Sourdough itself already has a head start. The natural fermentation process makes it easier on your digestive system. It also has a lower glycemic index than standard white bread, meaning it’s less likely to cause a dramatic spike and crash in your blood sugar. This translates to more stable energy levels and fewer cravings, a massive win for the ADHD brain which is already prone to chasing dopamine hits from sugary snacks.
Finally, this recipe includes whole wheat flour for extra fiber and vital wheat gluten for structure. The fiber adds to the feeling of fullness and supports gut health. This isn’t your average airy, unsubstantial slice. This is dense, chewy, satisfying bread that eats like a meal. When you can enjoy a hearty slice of toast or a sandwich that keeps you full for hours, you’re less likely to overeat later. That is how sustainable fat loss happens.
Ingredients You’ll Need for High-Protein Sourdough Bread
The magic of this recipe is in a few key ingredient tweaks that transform standard sourdough into a fitness-focused staple. Here is exactly what you will need to get started.
- For the Leaven:
- 50g active sourdough starter
- 50g bread flour
- 50g whole wheat flour
- 100g warm water
- For the Dough:
- 400g bread flour
- 100g whole wheat flour
- 25g vital wheat gluten
- 30g unflavored whey or pea protein powder
- 10g salt
- 350g warm water
- 100g non-fat Greek yogurt
The standout ingredients here are the unflavored protein powder and non-fat Greek yogurt. These are our protein powerhouses. It is critical to use unflavored protein powder, as any vanilla or chocolate flavor will completely ruin the classic sourdough taste. The Greek yogurt not only adds a significant protein boost but also contributes to a soft, moist crumb and a subtle tang.
Let’s talk about the flours. Using a mix of high-protein bread flour and whole wheat flour gives us the best of both worlds: great structure and a dose of fiber. The real secret weapon for texture, however, is the vital wheat gluten. Protein powder can interfere with gluten development, leading to a dense, crumbly loaf. Adding vital wheat gluten counteracts this, ensuring you still get that chewy, classic sourdough texture.
Lastly, your sourdough starter needs to be active and bubbly. An active starter is the engine of your bread. If it’s sleepy or sluggish, your bread won’t rise properly. Before you begin, feed your starter 4-8 hours beforehand and look for it to at least double in size. A healthy starter is key to a successful loaf.
How To Make Sourdough Bread (Step-By-Step)
Making sourdough bread can seem intimidating, especially for an ADHD brain that gets overwhelmed by multi-step projects. But we are going to break it down into simple, manageable chunks. Think of it as a series of short tasks spread over time. Set timers for each step and you’ll be fine.
1. Prepare the Leaven
The night before baking, you’ll mix your active starter with flour and water. This is creating a “leaven,” which is basically a large, supercharged batch of starter that will make your dough rise. Cover it and leave it on the counter overnight. ADHD Tip: Set a recurring alarm on your phone labeled “Mix Sourdough Leaven” for 9 PM so you don’t forget.
2. Autolyse
In the morning, in a large bowl, mix your flours, vital wheat gluten, and protein powder. Add the warm water and stir until it forms a shaggy, messy dough. There should be no dry bits of flour left. Cover it and let it sit for an hour. This step, called autolyse, lets the flour fully hydrate, making the dough stronger and easier to handle later.
3. Mix the Dough
Now, add your bubbly leaven, salt, and Greek yogurt to the dough. Get your hands in there and squish and squeeze everything together until it’s fully incorporated. It will feel sticky and messy, but that’s okay. Trust the process.
4. Bulk Fermentation and Stretch and Folds
This is the primary rising phase. For the first two hours, you’ll perform a set of “stretch and folds” every 30 minutes. Wet your hands, grab one side of the dough, stretch it up, and fold it over the center. Rotate the bowl and repeat on all four sides. This builds strength in the dough. ADHD Tip: Use a kitchen timer or your phone’s timer for each 30-minute interval. Don’t rely on your internal clock.
5. Preshaping
After the bulk fermentation, gently scrape the dough onto a lightly floured surface. Fold it into a loose round shape and let it rest for about 20 minutes. This step helps build tension on the surface of the dough, which will lead to a better final shape.
6. Final Shaping
Now, you’ll shape the dough into its final form, usually a tight ball (boule) or an oblong shape (batard). The goal is to create a tight “skin” on the outside of the dough. There are many great videos online demonstrating this technique if you’re a visual learner.
7. Cold Proof
Place your shaped dough into a floured basket or bowl, cover it, and pop it in the refrigerator for at least 12 hours and up to 18. This slow, cold fermentation develops that amazing, complex sourdough flavor and makes the dough much easier to handle and score.
8. Preheat Oven
This is a critical step. Place your Dutch oven, with the lid on, into your oven and preheat it to 500°F for a full hour. A screaming hot Dutch oven is the secret to getting that beautiful oven spring and crispy crust.
9. Bake
Carefully take the hot Dutch oven out. Flip your cold dough onto parchment paper, score the top with a sharp blade, and lower it into the pot. This is the moment of truth!
10. Baking with Steam
Put the lid back on, return it to the oven, and lower the temperature to 450°F. Bake for 20 minutes. The lid traps steam from the dough, creating a moist environment that allows the bread to expand fully.
11. Baking without Steam
After 20 minutes, remove the lid. This is when the crust will begin to brown and crisp up. Bake for another 20-25 minutes until it’s a deep golden brown.
12. Cool
This is the hardest step. You must let the bread cool completely on a wire rack for at least two hours before slicing. Slicing into hot bread will result in a gummy, doughy texture because the starches haven’t set yet. ADHD Tip: Set a timer and leave the kitchen. Go for a walk. Do anything to distract yourself from the amazing smell.
How To Serve Sourdough Bread (ADHD-Friendly)
Okay, you’ve done the work, and now you have a beautiful, high-protein loaf of sourdough bread. The best part is figuring out how to eat it in a way that fuels your body and fits your busy life. For us, that means simple, fast, and packed with even more protein.
The goal is to pair each slice with a quality protein and/or healthy fat source. This turns a simple piece of toast into a balanced meal that will crush cravings and keep your energy stable for hours. The key is to make it easy so that even on low-motivation days, a healthy choice is the path of least resistance.
Here are some of my go-to, brutally practical serving ideas:
- The Ultimate Protein Toast: My number one is to toast a thick slice and top it with a generous smear of low-fat cottage cheese or Greek yogurt. Finish with a sprinkle of everything bagel seasoning. It’s savory, satisfying, and takes about two minutes to make.
- Avocado Toast, Upgraded: Mash half an avocado on a toasted slice and top it with two fried or scrambled eggs. The healthy fats from the avocado and the protein from the eggs make this a powerhouse breakfast or lunch.
- A Better Sandwich Base: Use two slices to build a sandwich with lean protein like sliced turkey or chicken breast. Add some lettuce, tomato, and a light spread of hummus or mustard. It’s far more filling than any store-bought bread.
- Simple & Sweet: For a quick energy boost, toast a slice and top it with a thin layer of natural peanut butter and a few sliced strawberries or bananas.
Here’s a game-changing ADHD tip. Once the loaf has completely cooled, slice up half of it immediately. Store these slices in a zip-top bag on the counter. This tiny bit of prep removes the friction of having to get out a cutting board and knife every time you want a piece. When you’re hungry, you can just grab a slice and toast it. It makes the healthy choice the easy choice.
How To Store, Reheat, and Reuse Sourdough Bread
One of the best things about baking your own sourdough is having it available all week. But if you don’t store it properly, your hard work can go to waste. Proper storage keeps the crust crisp and the inside soft for as long as possible. The number one rule: do not store your bread in the refrigerator. The cold environment actually makes it go stale much faster.
Your goal is to balance moisture. For the first day or two, you can store the loaf cut-side down on a wooden cutting board, uncovered. This works great. For longer storage, a paper bag or a dedicated bread box is your best bet. Avoid plastic bags for counter storage, as they trap moisture and can lead to a soft, chewy crust and potential mold.
But my favorite method, and the one I recommend for anyone with ADHD, is the freezer hack.
- The Freezer is Your Friend: Once the bread is fully cool, slice the entire loaf. Place small squares of parchment paper between each slice to prevent them from sticking together.
- Bag and Freeze: Stack the slices and place them in a large freezer-safe zip-top bag. Squeeze out as much air as possible before sealing.
- Toast from Frozen: Whenever you want a slice, just pull one out and pop it directly into the toaster or a hot pan. It tastes just as good as fresh, and there’s zero waste. This method eliminates the pressure of having to finish a whole loaf before it goes stale.
What if a few slices do go stale? Don’t throw them out. Stale sourdough is an amazing ingredient. Cut it into cubes, toss with a little olive oil and seasoning, and bake them into delicious homemade croutons for salads. You can also blitz them in a food processor to make breadcrumbs for coating chicken or fish. This fits our core principle: be practical and avoid waste.
Easy Swaps & Variations for Sourdough Bread
One of the best things about this high-protein sourdough bread recipe is its flexibility. Once you get the basic technique down, you can start playing with the ingredients to match your taste, dietary needs, or simply what you have in the pantry. At ADHD FIT, we believe in flexible systems, not rigid rules.
If you’re looking to change things up, the flours are the easiest place to start. You can adjust the ratio of bread flour to whole wheat flour. Want a lighter loaf? Use more bread flour. Want something heartier and more rustic? Increase the whole wheat. You could even swap out 50g of the whole wheat flour for rye or spelt flour to introduce a different flavor profile.
Here are a few other simple swaps and additions you can try:
- Protein Powder Options: While unflavored whey isolate is my go-to, unflavored pea protein is an excellent dairy-free alternative that works well in this recipe. Just be aware that different protein powders can absorb liquid differently, so you might need to adjust your water by a tablespoon or two.
- Dairy-Free Yogurt: If you’re avoiding dairy, you can substitute the Greek yogurt with a thick, unsweetened dairy-free yogurt, like a coconut or soy-based option. This will slightly alter the flavor and texture, but the bread will still be delicious.
- Flavorful Add-ins: This is where you can get creative. During the last set of stretch and folds, try incorporating some fun ingredients. A tablespoon of chopped fresh rosemary, a half-cup of shredded sharp cheddar cheese, or a handful of sunflower and pumpkin seeds can completely transform your loaf.
Remember, baking is a process of experimentation. Don’t be afraid to make small changes and see what you like best. The worst that can happen is you make a slightly less-than-perfect loaf of bread, which is still better than most of what you can buy at the store. The goal is consistency, not perfection.
High-Protein Sourdough Bread
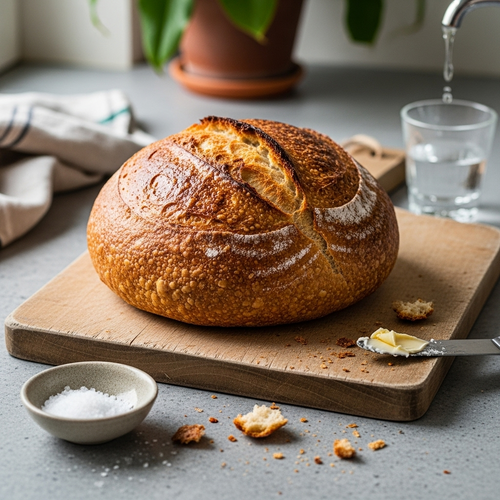
Description: A hearty, high-protein sourdough bread with a chewy crumb and crisp crust, designed to support fat loss goals without sacrificing the amazing flavor and texture of classic sourdough.
Prep Time: 24 hours (includes fermentation) | Cook Time: 45 minutes
Servings: 12 slices
Macros per Serving | Calories: 165 | Protein: 11g | Fat: 1g | Carbohydrates: 28g
Ingredients
- For the Leaven: 50g active sourdough starter, 50g bread flour, 50g whole wheat flour, 100g warm water
- For the Dough: 400g bread flour, 100g whole wheat flour, 25g vital wheat gluten, 30g unflavored whey or pea protein powder, 10g salt, 350g warm water, 100g non-fat Greek yogurt
Instructions
- Night Before: Mix leaven ingredients. Cover and let rest at room temperature for 8-12 hours.
- Morning: Mix flours, gluten, and protein powder. Add water and mix until no dry flour remains. Cover and rest for 1 hour (autolyse).
- Add leaven, salt, and Greek yogurt to the dough. Mix until fully incorporated.
- Perform 4 sets of stretch and folds every 30 minutes for the first 2 hours. Let the dough rise for another 2-4 hours.
- Shape the dough, place it in a floured banneton, cover, and refrigerate for 12-18 hours.
- Preheat oven with Dutch oven inside to 500°F for 1 hour.
- Score the cold dough and place it in the hot Dutch oven. Bake at 450°F for 20 minutes with the lid on.
- Remove the lid and bake for another 20-25 minutes until deep golden brown.
- Cool completely on a wire rack for at least 2 hours before slicing.
Notes
Patience is key! Do not slice the bread until it is completely cooled to ensure the best texture. Slicing warm bread will result in a gummy interior crumb.
FAQs About Sourdough Bread For Weight Loss
Here are some straightforward answers to the most common questions I receive about this sourdough bread recipe.
Is sourdough bread actually good for weight loss?
Yes, sourdough bread can absolutely be a part of a successful weight loss plan, and it’s a much smarter choice than conventional bread. The natural fermentation process breaks down some of the gluten and anti-nutrients in the flour, making it easier to digest. This process also gives it a lower glycemic index, which helps prevent the sharp blood sugar spikes that can lead to energy crashes and cravings.
Where this specific recipe really shines for weight loss is the added protein. By incorporating protein powder and Greek yogurt, we’ve turned a simple carb into a balanced food. Protein is incredibly satiating, meaning it helps you feel full and satisfied. When you eat a slice of this bread, you’re not just getting carbs; you’re getting a substantial dose of protein that will keep hunger at bay for hours. This is crucial for maintaining a calorie deficit without feeling constantly deprived.
Can I make this sourdough bread recipe without a Dutch oven?
A Dutch oven is highly recommended because it’s the best tool for trapping steam, which is essential for getting a great “oven spring” (the final burst of rising in the oven) and a crispy, crackly crust. The heavy cast iron also provides even, intense heat. However, if you don’t have one, you can still make a good loaf of bread with a little creativity.
One popular method is to use a large, oven-safe pot with a tight-fitting lid. The other option is to use a pizza stone or a heavy baking sheet. Preheat the stone just like you would the Dutch oven. When you’re ready to bake, you’ll need to create a steamy environment in your oven. Place a metal pan (not glass, it can shatter) on the rack below your baking stone. When you load the bread, carefully pour a cup of hot water into the pan to create a burst of steam. The results won’t be identical to the Dutch oven method, but it will get you much closer than baking it dry.
Why did my high-protein sourdough bread come out so dense?
A dense loaf is a common issue for new sourdough bakers, and a few factors could be at play. The most likely culprit is your starter. If your sourdough starter wasn’t fully active and bubbly when you mixed the leaven, it simply didn’t have enough power to lift the dough. Another possibility is under-fermentation. If you didn’t let the dough rise long enough during the bulk fermentation, the yeast didn’t have time to create enough gas to make the bread light and airy.
The added protein in this recipe can also contribute to a slightly denser crumb, which is exactly why we include vital wheat gluten to counteract it. If you skipped the vital wheat gluten, your bread would likely be quite dense. Finally, be gentle when you are shaping the dough. If you handle it too roughly and knock out all the air that developed during fermentation, you’ll end up with a tight, dense crumb. It takes a few tries to get a feel for it, so don’t be discouraged.
How do I know if my sourdough starter is ready to use?
Knowing your starter is ready is the key to a successful bake. The most reliable method is the “float test.” After you’ve fed your starter and it has peaked (doubled or tripled in size, full of bubbles), drop a small spoonful of it into a glass of room temperature water. If it floats, it’s full of gas and ready to leaven your bread. If it sinks, it needs more time to develop or may require another feeding.
Beyond the float test, use your senses. A ready starter will look very active, with lots of bubbles of various sizes visible on the surface and throughout the starter. It should smell pleasantly tangy and yeasty, almost like beer. If it smells strongly of acetone or vinegar, it’s likely gone too long and is very hungry. It might still work, but its leavening power will be diminished. For best results, aim to use it when it’s at its peak of activity.
Can I eat this sourdough bread on a low-carb diet?
This is a great question. This sourdough bread is a “smarter carb,” but it is not a “low-carb” or ketogenic food. Each slice still contains around 28 grams of carbohydrates. If you are following a very strict low-carb diet like keto, this bread would likely not fit your plan. However, if your goal is simply to be more mindful of your carbohydrate sources and prioritize nutrient density, it’s an excellent choice.
At ADHD FIT, we focus on flexible eating and balanced macros, not extreme restriction. For most people, including quality carb sources like this bread is sustainable and beneficial. The fiber from the whole grains and the protein we’ve added help to manage the body’s response to the carbs. It fits perfectly into a balanced diet where you’re tracking your overall calorie and macro intake for fat loss, rather than eliminating entire food groups.
Try These High-Protein Recipes Next
If you enjoyed making this high-protein sourdough, here are a few other bread recipes designed with the same principles of flavor, convenience, and fitness in mind.
- High-Protein Banana Bread Recipe: A delicious and moist banana bread that uses protein powder and Greek yogurt to create a perfect muscle-building snack or breakfast.
- 5-Ingredient Cottage Cheese Bread: This is a shockingly simple and savory bread that’s packed with protein from cottage cheese, perfect for sandwiches or toast.
- Simple Sourdough Bread For Beginners: If you’re looking to master a classic sourdough loaf without the protein additions, this is a fantastic and straightforward recipe to build your skills.
Give these a try and keep building your arsenal of healthy, sustainable meals.