If you told me ten years ago that a rice krispie treat would become a staple in my fat loss plan, I would have laughed. Back then, my relationship with food was all or nothing. I was either on a brutally strict diet or completely off the rails, usually triggered by a single craving I couldn’t manage.
Those classic, marshmallow-packed squares were the definition of an “off-limits” food. They represented pure sugar, a quick dopamine hit, and the start of a shame spiral that could last for days.
But my fitness journey, especially as a single dad with ADHD, forced me to get practical. I lost 65-70 pounds by learning to work with my brain, not against it. That meant ditching perfection and building a system that included foods I actually enjoyed. I needed snacks that were quick, satisfied my sweet tooth, and didn’t require a ton of executive function to prepare.
That’s how this high-protein rice krispie treat recipe was born. It’s the result of my core belief: consistency beats intensity, and flexible eating is the only way to make this lifestyle stick. This recipe isn’t about restriction. It’s about adding a tool to your toolbox that crushes cravings, boosts protein, and makes fat loss feel less like a punishment and more like a sustainable choice.
Skip to My Flexibe Diet Recipe!
Why Rice Krispie Treats Are Great For Fat Loss
Let’s be brutally honest. The original Rice Krispie Treat is not a health food. It’s a fantastic combination of sugar and simple carbs that provides a quick burst of energy followed by a crash. That’s the exact opposite of what we want for steady, sustainable fat loss.
So, how does this recipe flip the script? It’s all about the strategic ingredient swaps that align with our core principles. We put protein first, manage hunger, and keep convenience at the forefront. This isn’t a “cheat” food. It’s a planned part of a flexible diet.
First, we pack it with protein powder. Protein is the most satiating macronutrient, meaning it keeps you feeling full and satisfied for longer. This is critical for managing hunger and reducing the random, intense cravings that can derail our progress. When you have a protein-packed snack ready to go, you’re less likely to grab something that works against your goals.
Second, we use healthy fats from almond butter and coconut oil. These fats provide steady energy and further help with satiety. Unlike the sugar rush from marshmallows, this combination of protein and fat helps prevent blood sugar spikes and crashes, which is a game-changer for mood and energy regulation, especially for the ADHD brain.
Finally, it satisfies the psychological need for a treat. A restrictive diet is a fragile diet. By building in small, planned comfort foods like this high-protein rice krispie treat, you eliminate the feeling of deprivation. This prevents the “what the hell” effect, where one “bad” food leads to a full-blown binge. It’s a smart, sustainable way to enjoy what you eat while consistently moving toward your goals.
Ingredients You’ll Need for Rice Krispie Treats
Simplicity is key, especially on low-motivation days. This recipe uses straightforward ingredients you can find at most grocery stores or online. We’re focusing on nutrient-dense options that turn a classic treat into a powerhouse snack.
Here’s exactly what you’ll need:
- 6 cups high-protein crispy rice cereal
- 1 cup vanilla or unflavored casein or plant-based protein powder
- 1/2 cup creamy almond butter
- 1/3 cup sugar-free maple-flavored syrup
- 1/4 cup coconut oil
- 1 teaspoon vanilla extract
- 1/4 teaspoon salt
The key ingredient giving this recipe its fat-loss twist is the protein powder. This is what transforms the treat from empty calories into a functional food that supports muscle retention and hunger management. I recommend using casein or a plant-based blend because they tend to be thicker than whey protein. This helps the treats bind together properly without getting too sticky or gooey. Whey can sometimes result in a looser texture, so if you use it, you might need to add a little less liquid or a bit more protein powder to get the consistency right.
For the almond butter, choose a creamy, natural variety where the only ingredients are almonds and maybe a little salt. The oily texture of natural nut butters helps the mixture melt smoothly and combine well. Avoid brands with added sugars or hydrogenated oils, as they add unnecessary calories and can change the final texture. The sugar-free syrup provides sweetness without the sugar load, keeping the recipe macro-friendly and better for stable energy levels.
How To Make Rice Krispie Treats (Step-By-Step)
This is a no-bake recipe, which is perfect for those of us with ADHD. Fewer steps and less waiting around means it’s more likely to get done. The whole process takes about 15 minutes, and most of that is just mixing. Let’s get to it.
1. Prepare Your Pan and Dry Ingredients
First things first, let’s get organized to avoid any last-minute scrambling. Grab an 8×8 inch baking pan and line it with parchment paper. Leave a little extra paper hanging over the sides to use as “handles” later. This makes it incredibly easy to lift the treats out for cutting. In a large mixing bowl, combine the 6 cups of high-protein crispy rice cereal and the 1 cup of protein powder. Give it a quick stir with a spatula to distribute the powder evenly.
2. Melt the Wet Ingredients
In a small saucepan, combine the 1/2 cup of almond butter, 1/3 cup of sugar-free syrup, and 1/4 cup of coconut oil. Place it over low heat. The key here is low heat. You are just melting and combining, not cooking. Stir it constantly until everything is melted and you have a smooth, liquid consistency. If the heat is too high, you risk scorching the almond butter, which will ruin the flavor.
3. Combine Everything
Once the wet mixture is smooth, remove the saucepan from the heat. Stir in the 1 teaspoon of vanilla extract and 1/4 teaspoon of salt. Now, work quickly. Pour this hot liquid mixture over your cereal and protein powder in the large bowl. Use a sturdy spatula to mix everything together until the cereal is completely and evenly coated. You have to move fast because the mixture will start to stiffen as it cools.
4. Press and Set
Immediately transfer the sticky mixture into your prepared baking pan. Here’s an ADHD-friendly tip to avoid a sticky mess: use a second piece of parchment paper or wet your spatula slightly to press the mixture down firmly and evenly into the pan. You want to pack it tightly so the bars hold together. Let the pan sit at room temperature for at least 30 minutes to set. If you’re impatient, you can pop it in the fridge for 15 minutes. Once firm, use the parchment handles to lift the block out, place it on a cutting board, and slice it into squares.
How To Serve Rice Krispie Treats (ADHD-Friendly)
Having a delicious, macro-friendly snack is one thing. Actually incorporating it into your life in a way that helps, not hinders, is another. For those of us with ADHD, convenience and lack of friction are everything. If it’s not easy to grab, it might as well not exist.
The best way to serve these treats is to make them part of a system. Don’t just leave the whole pan in the fridge. That requires a decision, a knife, and a plate every time you want one. That’s too many steps when you’re hungry and your executive function is low.
Instead, embrace pre-portioning. Once the treats have set, cut the entire batch into your desired number of squares (I usually do 12). Then, immediately wrap each square individually in plastic wrap or put them in small snack-sized bags or containers. Now you have a grab-and-go snack that requires zero thought.
This simple prep step makes them incredibly versatile. Here are a few ways to use them:
- As a pre-workout snack: The carbs from the cereal provide quick energy for your workout, while the protein sets you up for recovery. Grab one 30-45 minutes before a training session.
- To crush afternoon cravings: That 3 p.m. slump is real. Instead of reaching for office donuts or a candy bar, you have a planned treat that satisfies your sweet tooth and provides protein and healthy fats to keep you full until dinner.
- A simple dessert: A restrictive diet often fails because it feels like a punishment. Ending your day with one of these treats can feel like a reward, making it easier to stick to your plan long-term. It prevents the “I deserve a whole pint of ice cream” spiral.
By preparing them ahead of time, you remove the decision-making process when you’re most vulnerable to making poor food choices. It’s a brutally practical strategy that supports your goals by working with your brain’s need for simplicity.
How To Store, Reheat, and Reuse Rice Krispie Treats
Proper storage is essential for making sure your prep work pays off. The goal is to keep these treats fresh, delicious, and easy to access. The good news is that these are incredibly low-maintenance. No reheating is required, which is a huge win for convenience.
The best way to store your high-protein Rice Krispie treats is in an airtight container. This prevents them from getting stale and absorbing any stray flavors from your fridge or pantry. Where you store them depends on how quickly you plan to eat them and your texture preference.
Here are your main storage options:
- Room Temperature: If you plan to eat the treats within 2-3 days, you can store them in an airtight container on the counter. They will stay softer and chewier this way. Just make sure they are away from direct sunlight or heat sources.
- Refrigerator: For longer storage, up to a week, the fridge is your best bet. Storing them in the refrigerator will make them firmer and denser. I personally prefer this texture. To prevent them from getting rock-hard, let a square sit out for 5-10 minutes before eating, or just enjoy the firm, chewy bite straight from the fridge.
- Freezer: These treats are fantastic for freezer meal prep. You can make a double batch and freeze half for later. Wrap each square individually in plastic wrap, then place them all inside a larger freezer-safe bag or container. They will last for up to 3 months. To thaw, simply pull one out and let it sit on the counter for 15-20 minutes.
As I mentioned, the key to making storage ADHD-friendly is prepping for your future self. Always cut the treats into individual portions before storing them. This removes a barrier. When you need a quick snack, you can just grab one and go without any extra steps. This small bit of planning makes a massive difference in staying consistent.
Easy Swaps & Variations for Rice Krispie Treats
One of the core tenets of our approach at ADHD FIT is flexibility. A recipe is a template, not a rigid set of rules. You should feel empowered to adapt it based on what you have in your pantry, your dietary needs, or just your flavor preferences. This high-protein rice krispie treat recipe is incredibly forgiving and easy to customize.
Don’t be afraid to experiment. The worst that can happen is you create a slightly different texture, but it will almost always still be delicious. Consistency over perfection applies to cooking, too.
Here are some simple swaps and fun variations you can try:
- Nut Butter Variations: Don’t have almond butter? No problem. Creamy peanut butter or cashew butter will work perfectly. Just be mindful that this will change the nutrition facts slightly. For a nut-free version, try sunflower seed butter.
- Protein Powder Flavors: While vanilla is a great neutral base, you can completely change the flavor profile with different protein powders. Chocolate protein powder is an obvious and delicious choice. You could also try salted caramel, cinnamon bun, or even strawberry for a unique twist.
- Mix-Ins and Toppings: Feel free to add about 1/4 to 1/2 cup of mix-ins. Some great options include sugar-free chocolate chips, chopped nuts (like almonds or walnuts for extra crunch), or unsweetened shredded coconut. For a topping, you can melt some sugar-free chocolate and drizzle it over the top before the treats set.
- Cereal Swaps: While high-protein crispy rice cereal is ideal for boosting the macros, you can use regular Rice Krispies or another puffed rice cereal if that’s what you have. The protein content will be lower, but it will still be a healthier option than the original recipe. Puffed wheat or corn flakes could also work for a different texture.
Making this recipe work for you is the most important part. If a small tweak makes you more likely to prepare and eat it, then it’s the right choice. The goal is to create a reliable, go-to snack that you genuinely enjoy and that supports your fat loss journey without adding stress or complexity to your life.
High-Protein Rice Krispie Treats
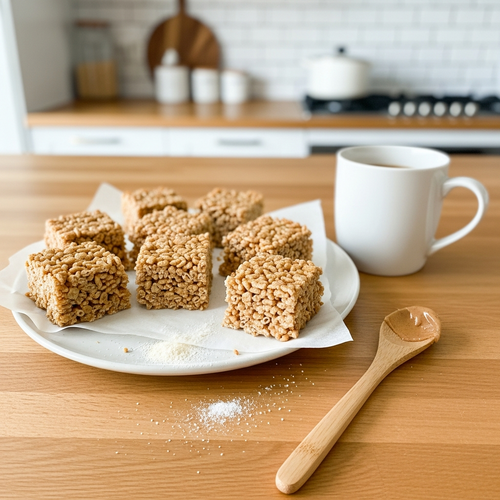
Description: A simple, no-bake recipe that turns a childhood classic into a macro-friendly snack perfect for fat loss and muscle building.
Prep Time: 5 minutes | Cook Time: 10 minutes
Servings: 12
Macros per Serving | Calories: 195 | Protein: 12g | Fat: 11g | Carbohydrates: 13g
Ingredients
- 6 cups high-protein crispy rice cereal
- 1 cup vanilla or unflavored casein or plant-based protein powder
- 1/2 cup creamy almond butter
- 1/3 cup sugar-free maple-flavored syrup
- 1/4 cup coconut oil
- 1 teaspoon vanilla extract
- 1/4 teaspoon salt
Instructions
- Line an 8×8 inch pan with parchment paper.
- In a large bowl, mix the cereal and protein powder.
- In a saucepan on low heat, melt almond butter, syrup, and coconut oil until smooth.
- Remove from heat and stir in vanilla and salt.
- Pour the wet mixture over the dry mixture and stir quickly until everything is coated.
- Press the mixture firmly into the prepared pan.
- Let set at room temperature for 30 minutes or in the fridge for 15 minutes before cutting into 12 squares.
Notes
Using casein or a plant-based protein powder blend provides the best texture. If you use whey, the treats may be a bit softer. Press the mixture down firmly in the pan to ensure the bars hold together well.
FAQs About Rice Krispie Treats For Weight Loss
Here are some straightforward answers to the most common questions I receive about this protein rice krispie treat recipe.
Can I use whey protein for this rice krispie treat recipe?
You absolutely can, but you may notice a difference in the final texture. I recommend casein or a plant-based protein blend because they are generally thicker and absorb less liquid than whey isolate. This helps create a dense, chewy bar that holds together perfectly. Whey protein is much finer and can sometimes result in a stickier, gooier, or even slightly drier final product, depending on the brand.
If whey is all you have, go for it! Just be prepared to make a small adjustment. You might find you need to add slightly more cereal or a little less of the liquid mixture to get the right consistency. A great trick is to start by holding back a tablespoon or two of the wet ingredients, mix everything together, and then add the rest only if the mixture seems too dry. It’s a flexible recipe, so don’t stress about perfection. The treats will still be delicious and packed with protein.
How is this protein rice krispie treat better than a store-bought protein bar?
This is a fantastic question. While many store-bought protein bars are convenient, they often come with downsides. Many are highly processed and filled with sugar alcohols that can cause digestive upset, along with a long list of artificial ingredients, fillers, and preservatives. They can also be quite expensive, and honestly, many of them have a chalky texture or a weird chemical aftertaste.
By making your own protein rice krispie treat, you have 100% control over the ingredients. You are using whole-food sources like almond butter and coconut oil, and you can choose a high-quality protein powder that you trust and enjoy. This recipe avoids the common pitfalls of processed bars, providing a cleaner source of macros without the digestive issues. Plus, from a psychological standpoint, eating something that feels like a real treat can be far more satisfying than choking down a dense, chalky bar, making it easier to stick with your plan long-term.
Will eating this high-protein rice krispie treat make me gain weight?
No single food can make you gain weight on its own. Weight gain is the result of consistently consuming more calories than your body burns over time. This rice krispie treat recipe is specifically designed to fit into a fat loss or weight maintenance plan. Each treat is portion-controlled and balanced with protein, healthy fats, and carbohydrates to support your goals, not sabotage them.
The key is how you incorporate it into your overall daily intake. The high protein and fat content are designed to promote satiety, helping you feel full and satisfied, which can actually prevent overeating later. By using it as a planned snack to manage cravings or fuel a workout, you are using it strategically. As long as this treat fits within your daily calorie and macro targets, it will absolutely support your weight loss efforts by making your diet more sustainable and enjoyable.
What is the best high-protein crispy rice cereal for this rice krispie treat?
The market for high-protein foods has exploded, which is great for us. A few years ago, options were limited, but now you can find several brands of protein-infused rice cereal. Brands like Magic Spoon or Premier Protein make excellent cereal options that are high in protein and low in sugar. These are fantastic for maximizing the protein content of your treats.
However, don’t let a search for the “perfect” cereal stop you from making the recipe. That’s a classic ADHD trap. If you can’t find a specific high-protein brand or don’t want to spend the extra money, using regular Rice Krispies or any generic brand of crisp rice cereal works just fine. The recipe will still get a massive protein boost from the cup of protein powder. The most important thing is to make the recipe, not to hunt down one specific ingredient.
Can I make this rice krispie treat recipe vegan?
Yes, making this recipe vegan is incredibly simple. The original ingredient list is already very close to being fully plant-based. The only ingredient you need to be mindful of is your protein powder. The recipe already suggests a plant-based protein powder as a primary option alongside casein.
To ensure the entire recipe is vegan, just make these two selections: use a plant-based protein powder (common blends include pea, soy, brown rice, or a mix) and ensure your sugar-free maple-flavored syrup is certified vegan (most are, but it’s always good to check the label for any non-vegan processing agents). All the other ingredients, including the high-protein cereal (check brand specifics), almond butter, coconut oil, vanilla, and salt, are typically vegan-friendly. This allows you to create a delicious, plant-based, high-protein snack with no complicated substitutions.
Try These High-Protein Recipes Next
If you loved how simple and effective this recipe is, here are a few other high-protein favorites from our community.
- 5-Minute No-Bake Protein Bars: Another incredibly fast, no-bake recipe for when you need a satisfying snack without the oven.
- High-Protein Rice Pudding: A creamy, comforting classic redesigned to be packed with protein and perfect for a healthy dessert or breakfast.
- Caramel Macchiato Krispie Treats: For when you want to try a different flavor twist, this recipe offers a delicious coffee-inspired take on the classic treat.
Building a collection of simple, go-to recipes is the best way to stay consistent and reach your goals.